“It is well-known that the x86 instruction set is baroque, overcomplicated, and redundantly redundant.” - Stephen Dolan
Introduction
In our grand arc of introductory topics, this sadly is nearing the end.
We now most of the basic required components to analyze how a high-level C code program can get translated into 1’s and 0’s on a processor. One last piece of the puzzle - we’ll introduce a particular assembly language - x86 - and then show how C code constructs are implemented using the assembly language.
x86
x86 (pronounced “ecks - eighty - six”) is the name for one of the most ubiquitous processor architectures in the world today. x86 is very old, dating back to some of the initial processors that Intel manufactured. Intel has been very rigirous about keeping it backward compatible, so the full specification carries most of the legacy functionality of processors manufactured 20 to 30 years ago. This makes the full specification around 2900 pages long - not exactly light reading.
When learning about x86, it’s better to start not with the actual documentation, but one of the many helpful guides out there. Here is another good one.
The Basics
In order to introduce how your C code gets executed on a processor, we’re going to start by a basic overview of how programming in x86 assembly works.
As a basic review, recall that when we write assembly code, there is a one to one mapping from assembly instructions to bits that go into and out of the processor. Whenever we describe some particular assembly instruction in this post, just remember that you can go straight from that to bits.
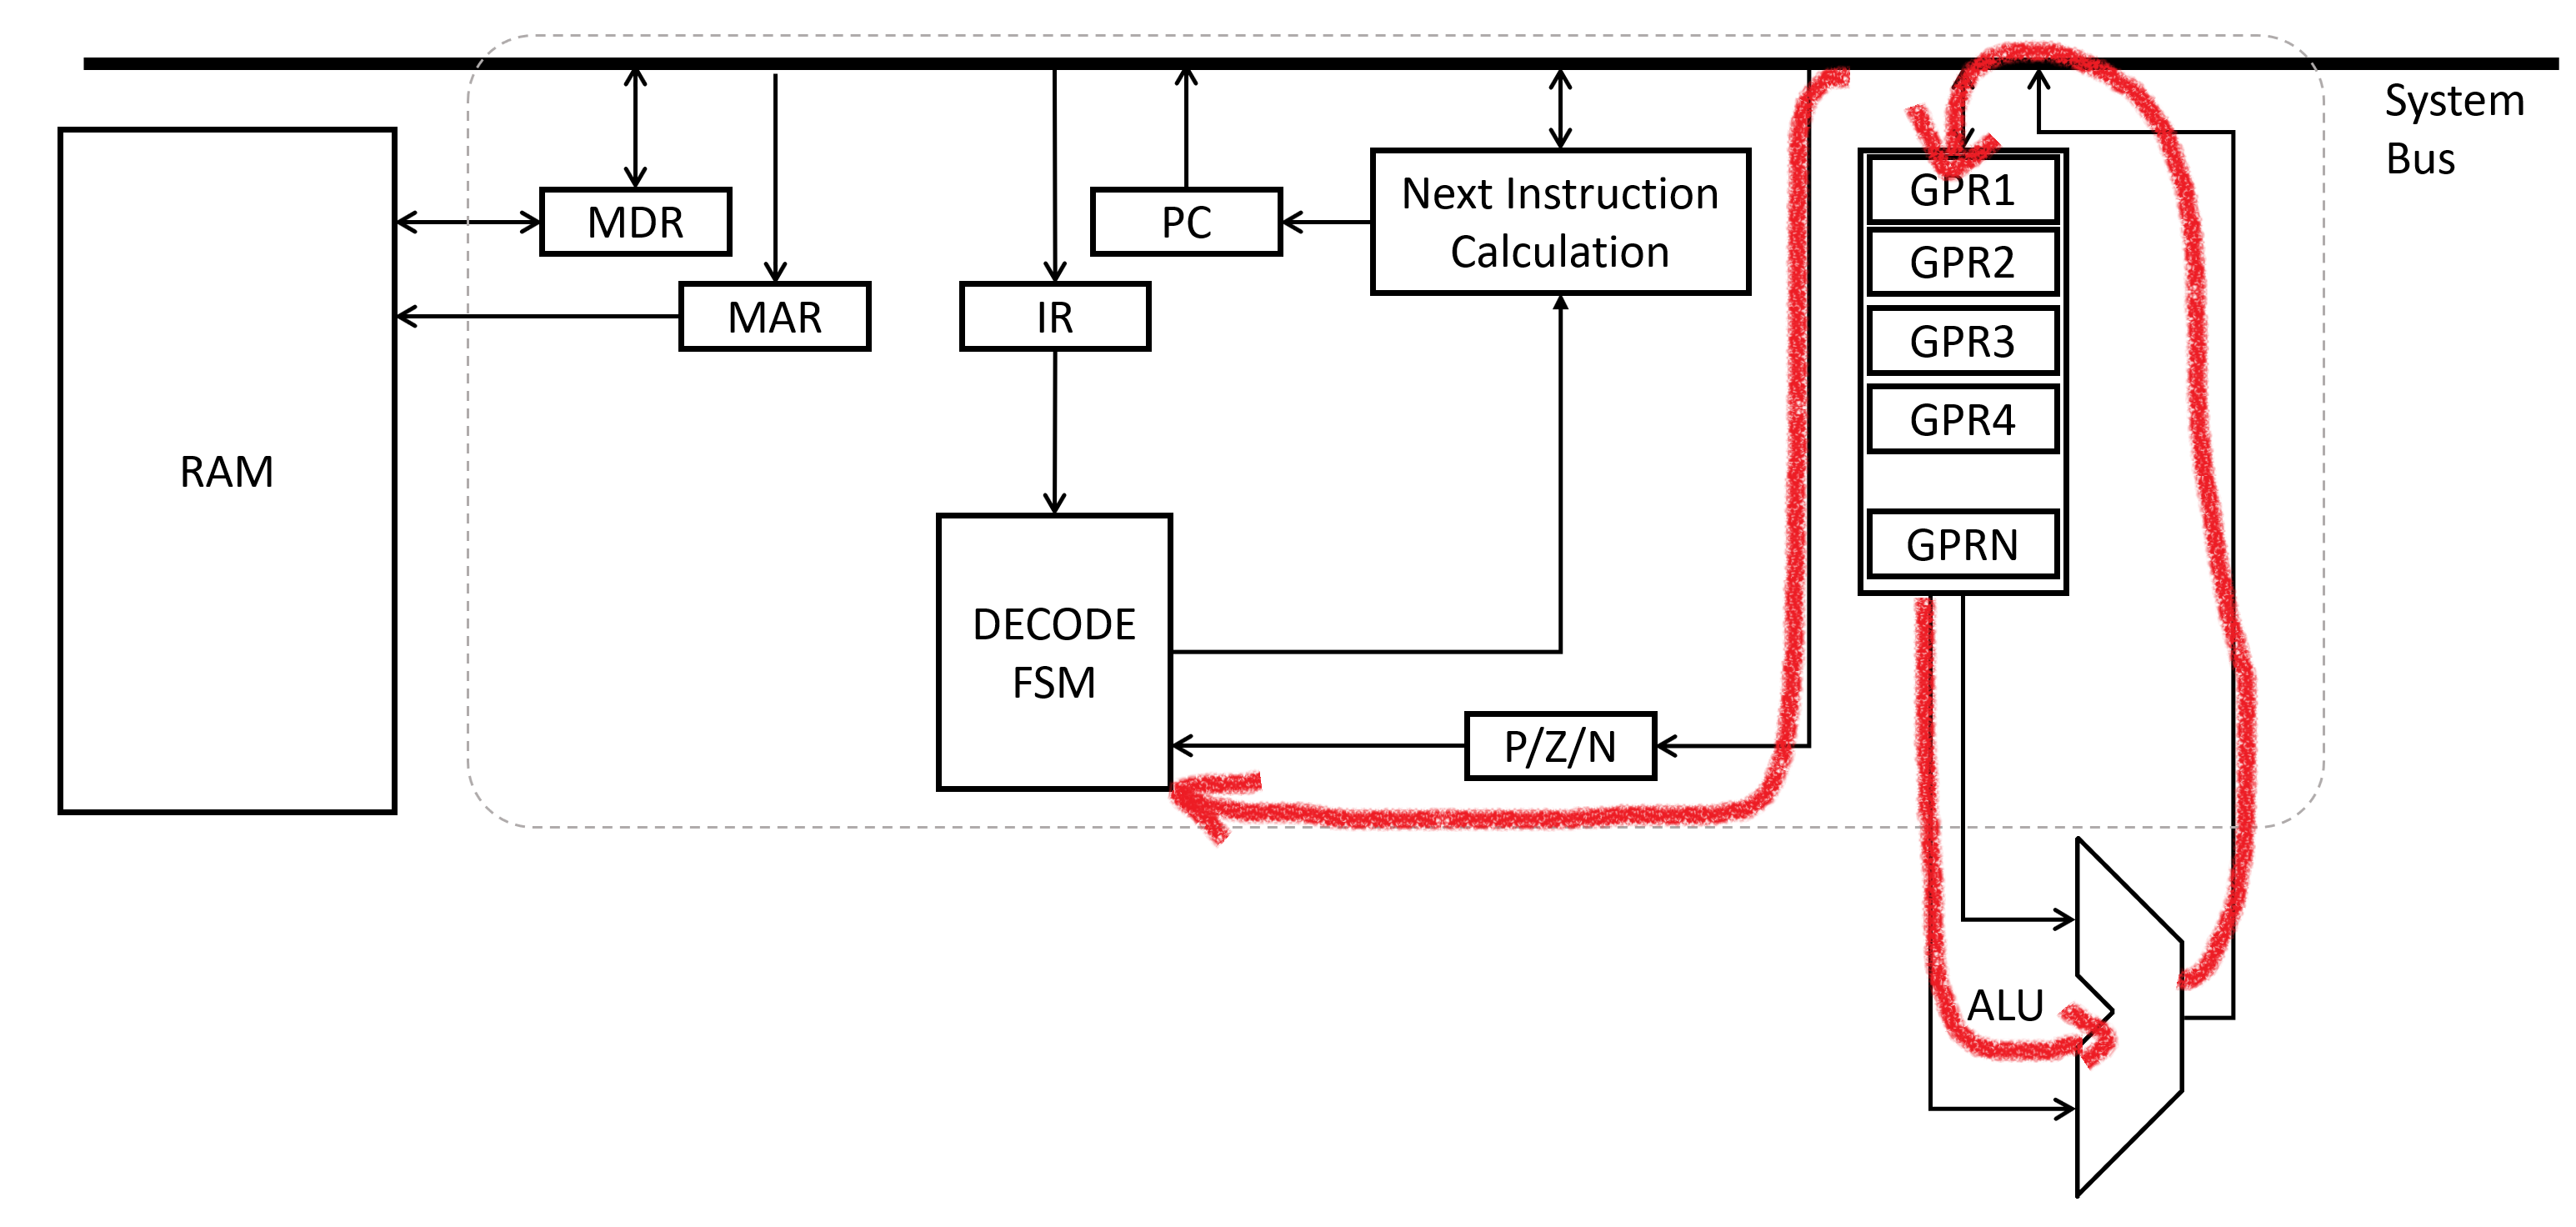
Which bits is described within the x86 software developer’s reference manual. This behemoth of documentation describes, in great detail, the operation of every assembly instruction, and how to encode it into bits. Diagrams like this one explain the mapping:
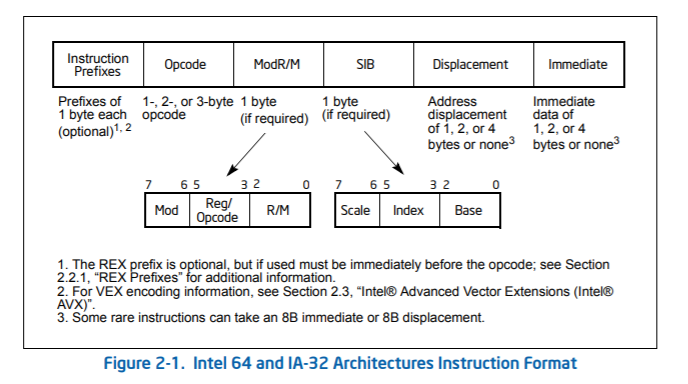
Which, as you are probably guessing, is not the most straightforward of methodologies. It’s totally feasable to figure out though, but that figuring will be left as an exerices to the user. It’s all there in that manual though, I promise.
Again though, at least for the sake of this post, keep in mind that given an assembly instruction, you can get bits which go into a processor. All such that we can define what the starting layout of 1’s and 0’s in our RAM looks like:
When writing assembly code, what you are really doing is defining the bits that will go into memory as the stored program, eventually executed by a processor. Once you have the right set of bits, you just have to load them into memory at just the right spot, then fire up the processor. It will pick the first address, and start running your program from the beginning.
How these instructions are loaded into Memory will have to be a future post, as it’s beyond the scope of this discussion. For now, I promise, there is a way to make it happen, and it does happen.
Setting Aside Memory for Storage
In addition to the actual instructions to run, you’ll also generally want to reserve memory locations to store values. Here’s a brief hint of where we’re going - remember variables from C syntax? Any time you have a variable, you’ll need some memory to store it. When writing x86 assembly, you can mark off a sets of bits for usage as variables:
section .data
myVariable  DB 42
myOtherVariable DW 25
The .data directive tells the assembler that the things which follow are memory locations for variables, not code. The name of the variable comes first, followed by some string like DB or DW to indicate how many bytes the variable occupies. DB is one byte, DW is two, DD is four… others exist. The final thing can be optional, and dictates what the memory is to be set to prior to any code running. In this case, myVariable gets set to The Answer to the Ultimate Question of Life, the Universe, and Everything, while myOtherVariable gets set to 25.
It’s worthwhile to note that when working with these labeled memory locations, the name (eg, myVariable) refers to the actual memory address, while putting it in brackets (eg, [myVariable]) refers to the value at that address. When working with instructions, sometimes the assembly instruction needs a memory address, and other times it needs a value. Use each form as needed.
As in all programming languages worth their salt, it is also possible to write comments in your assembly code.
;---------------------------------------------------
; Herp Derp this is where the global variables go!
; Aren't comments the best?
;---------------------------------------------------
section .data
myVariable  DB 42
myOtherVariable DW 25
Registers
We’ll now attempt to describe the General Purpose registers of interest to us in x86 processor architecture.
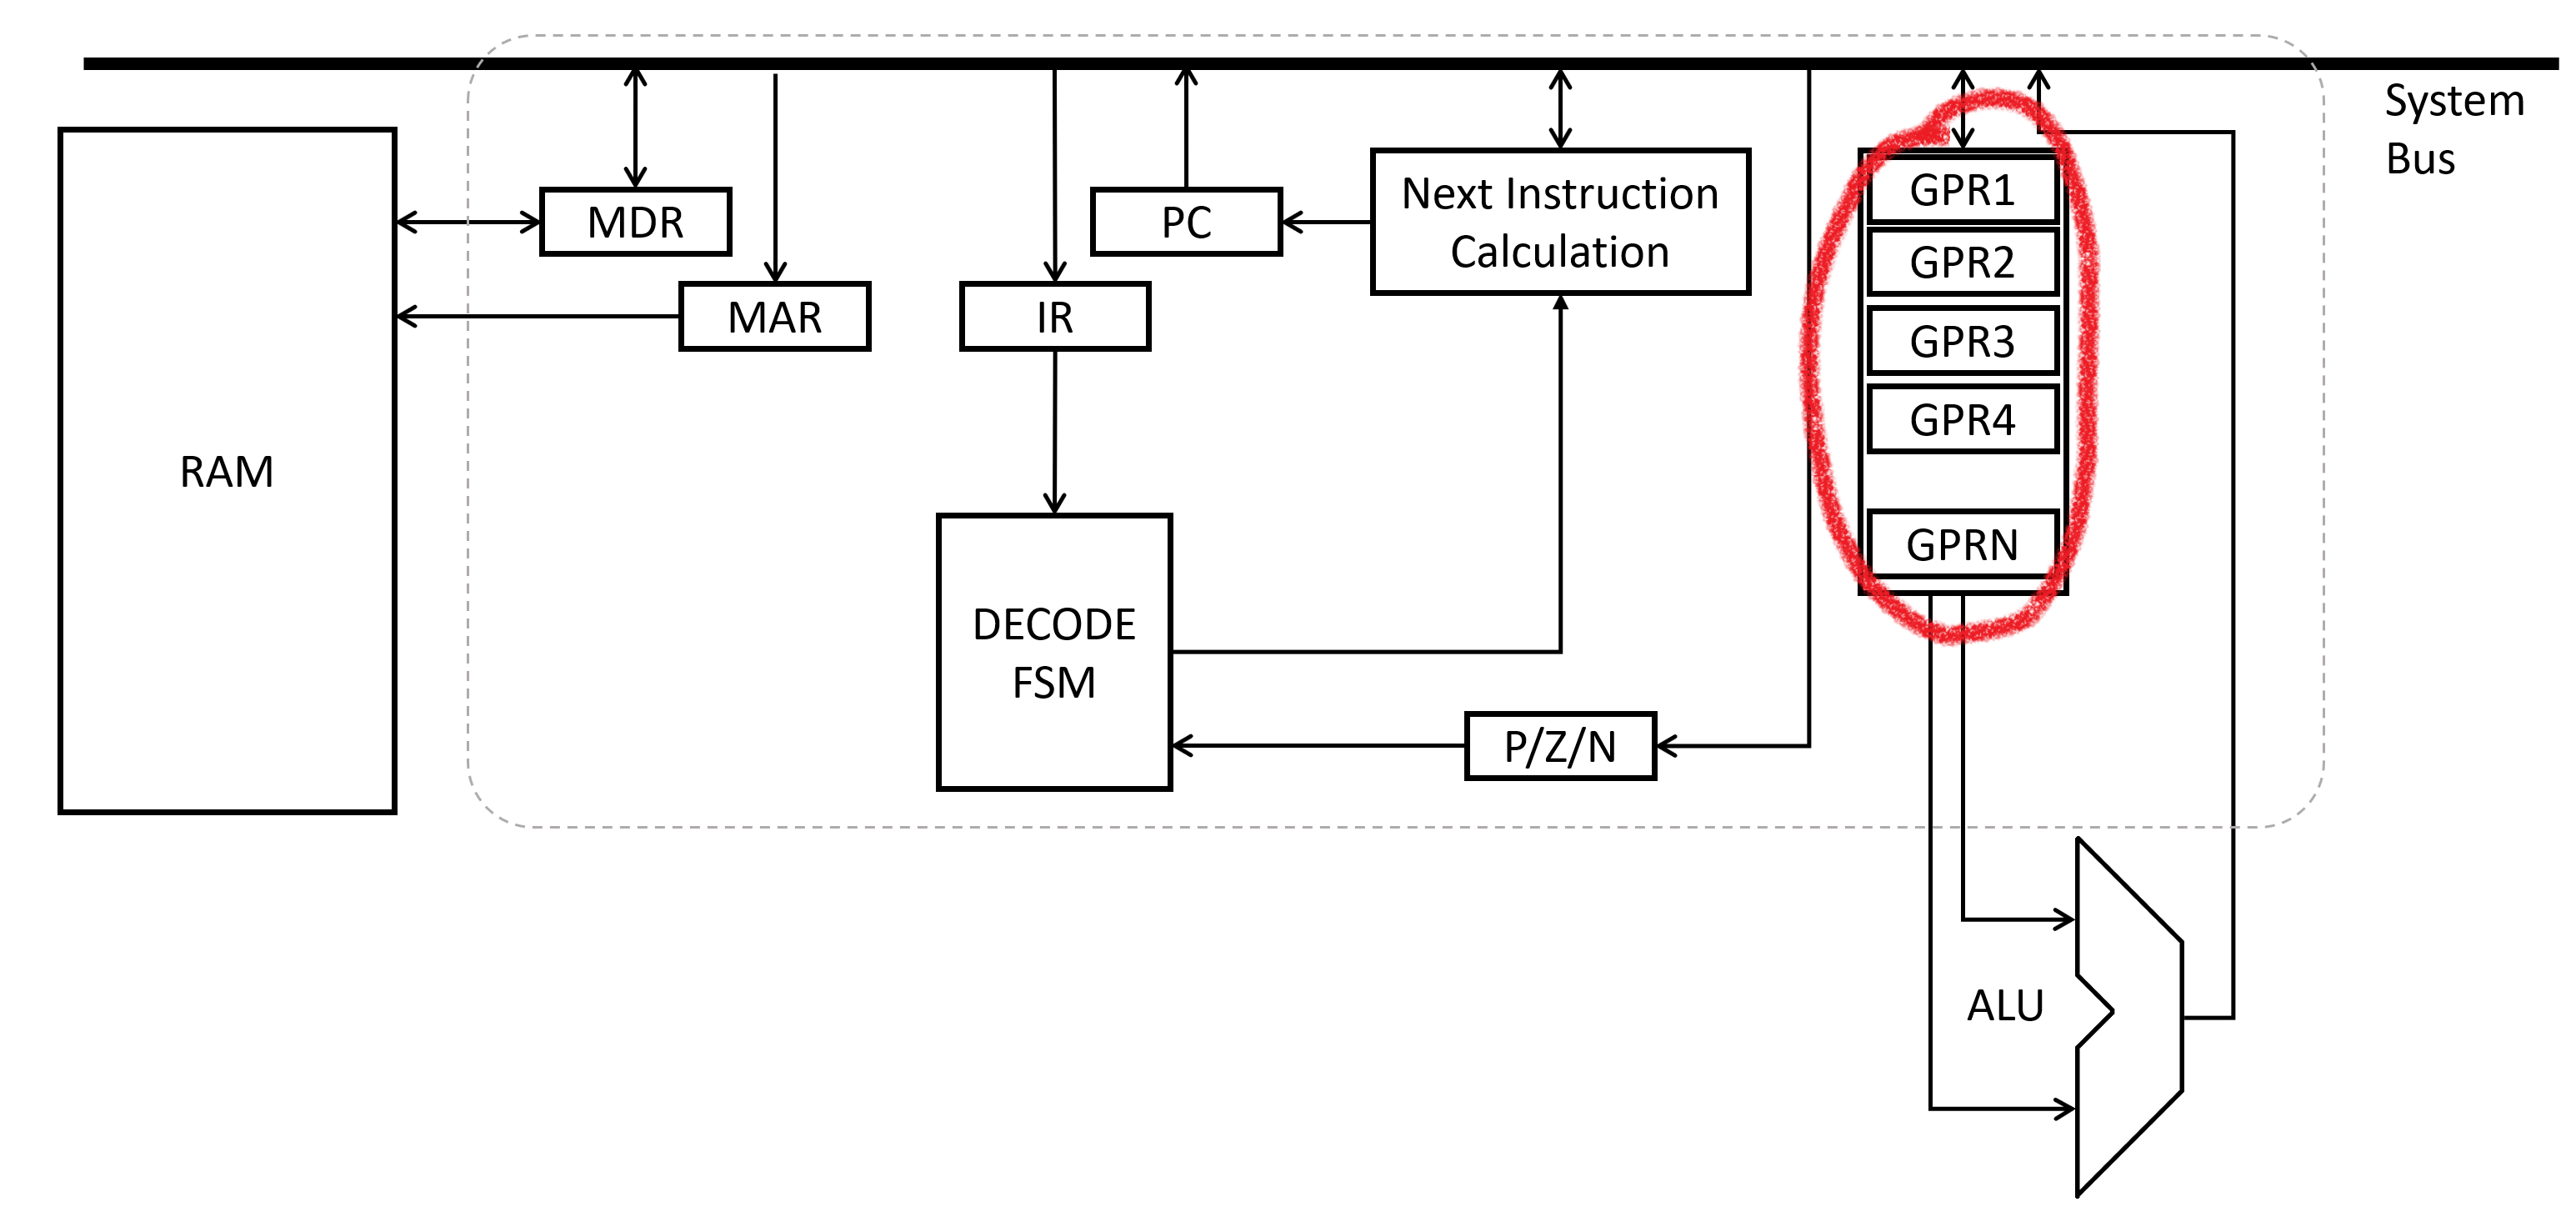
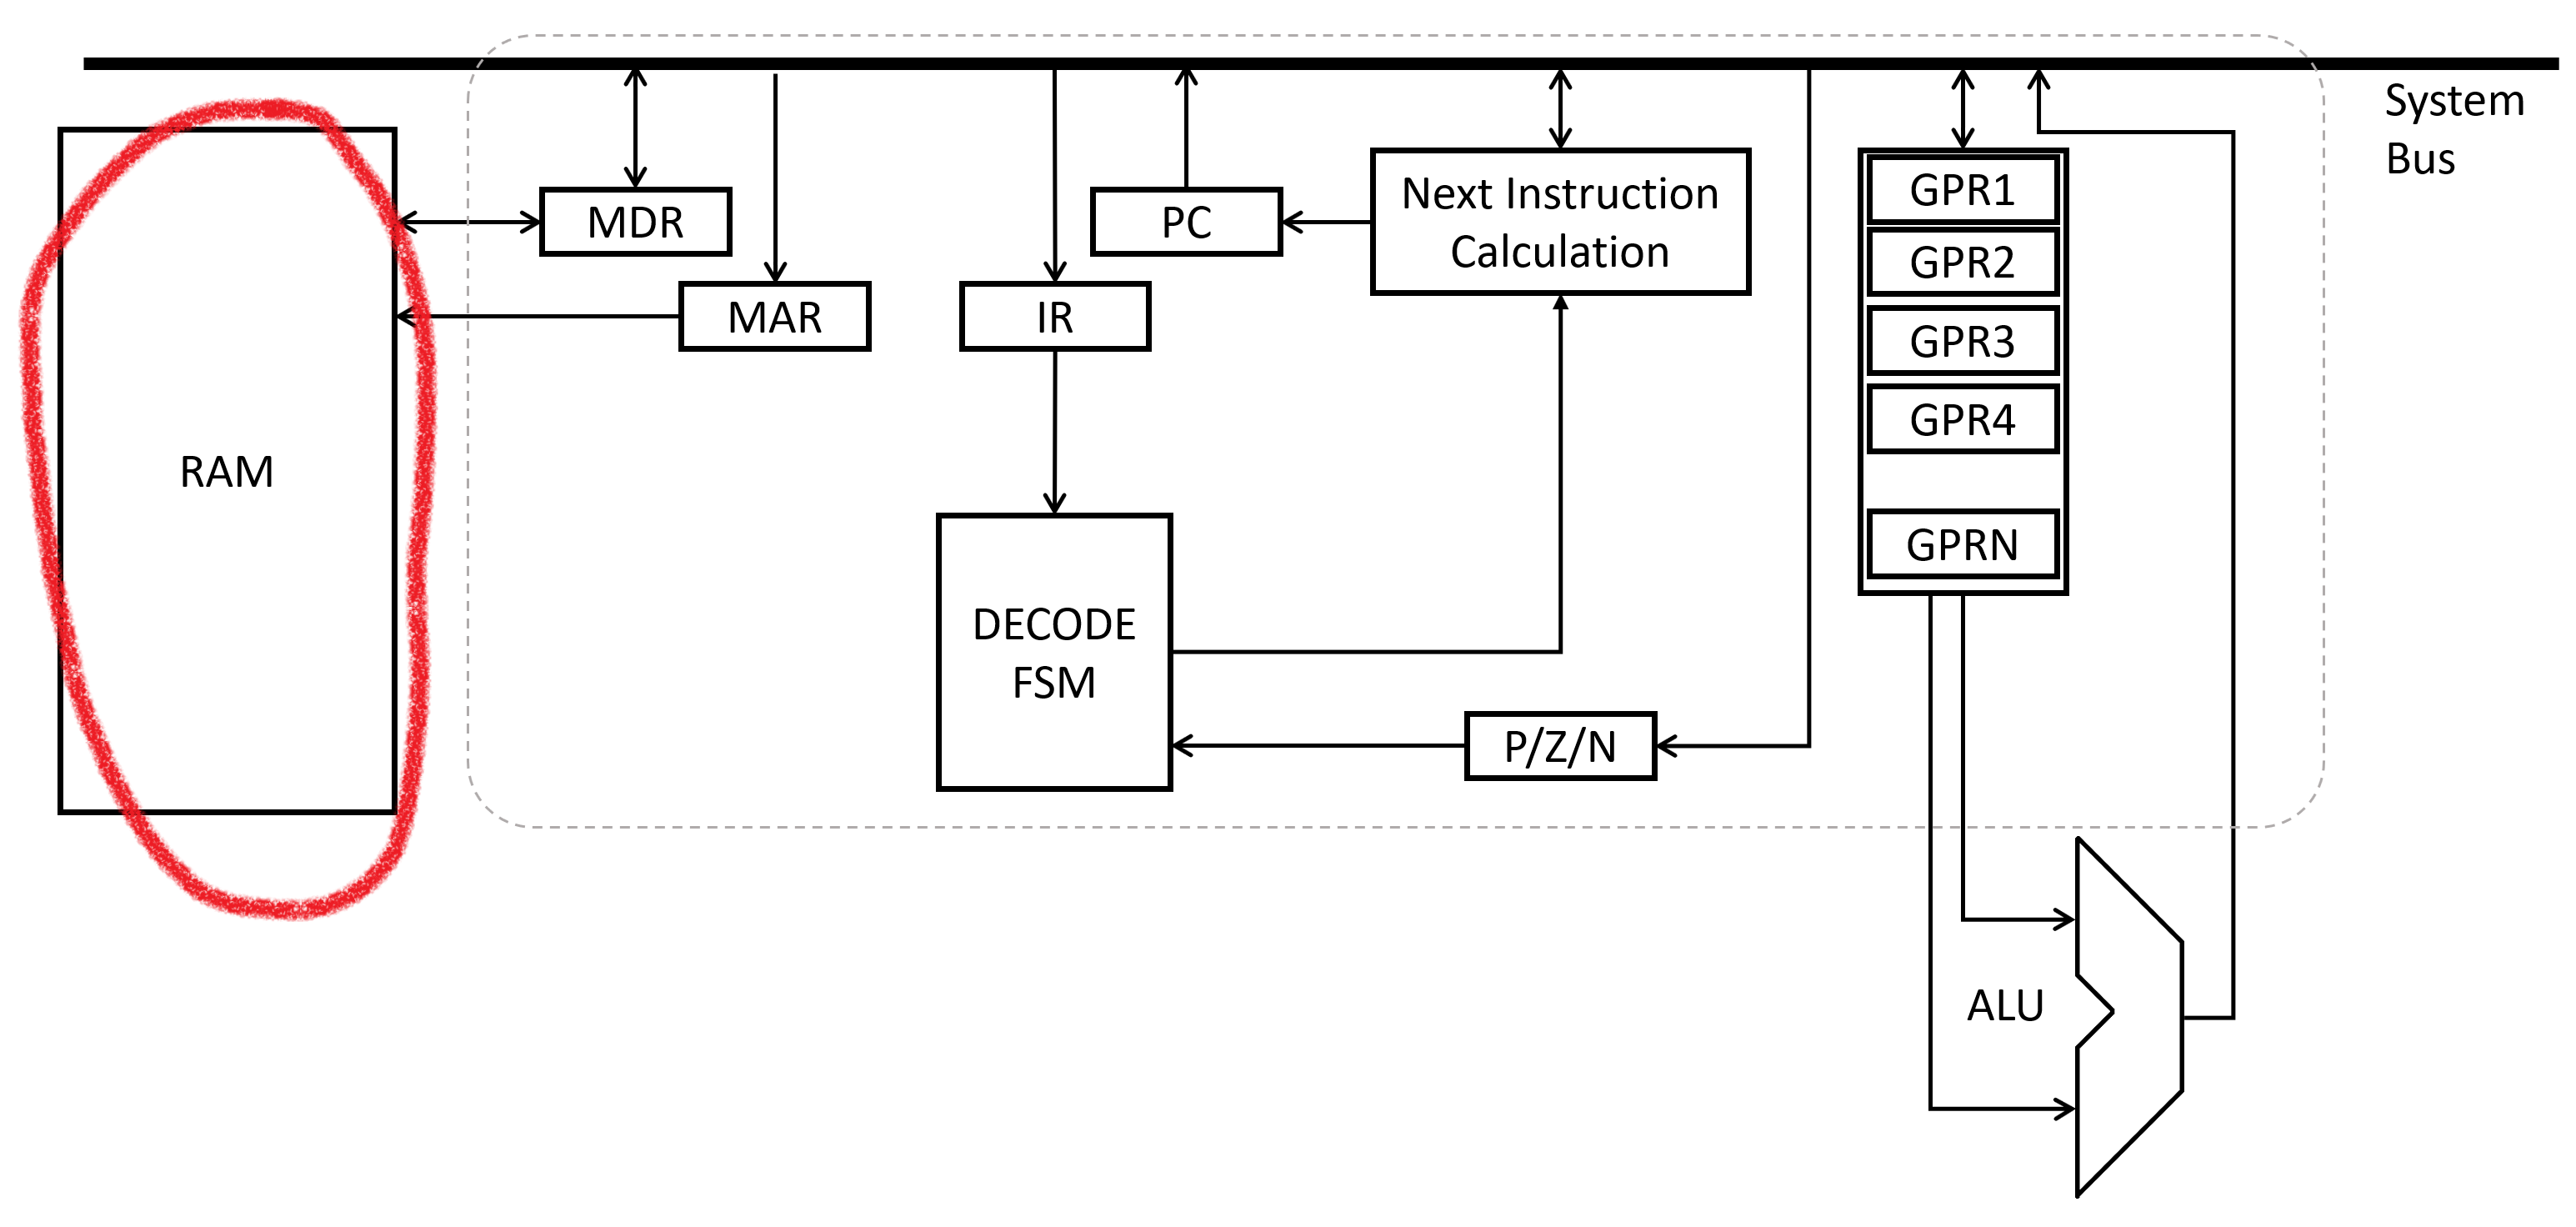
Accessing memory addresses can be slow, so for rapid access of heavily-manipulated values, it’s common place to use a general purpose register to store the quantity. Physically located close to the center of the processor and implemented with high-speed circuitry, these registers are limited in quantity but abundant in speed and capiability. Additionally, some assembly instructions can only work with certain registers, so it’s required to populate the register first before running the restricted assembly instruction.
There are a lof these on the x86 architecture, but there’s just a handful we’ll focus on for now. Their names are:
EAXEBXECXEDX
These four in particular can be used to store pretty much whatever values you want. Other registers have more restrictions, but these are the most general-purpose of all the general-purpose registers.
Memory and Register Transfer
To do anything useful, we’ll first want to know how to assign and move data values around in the processor.
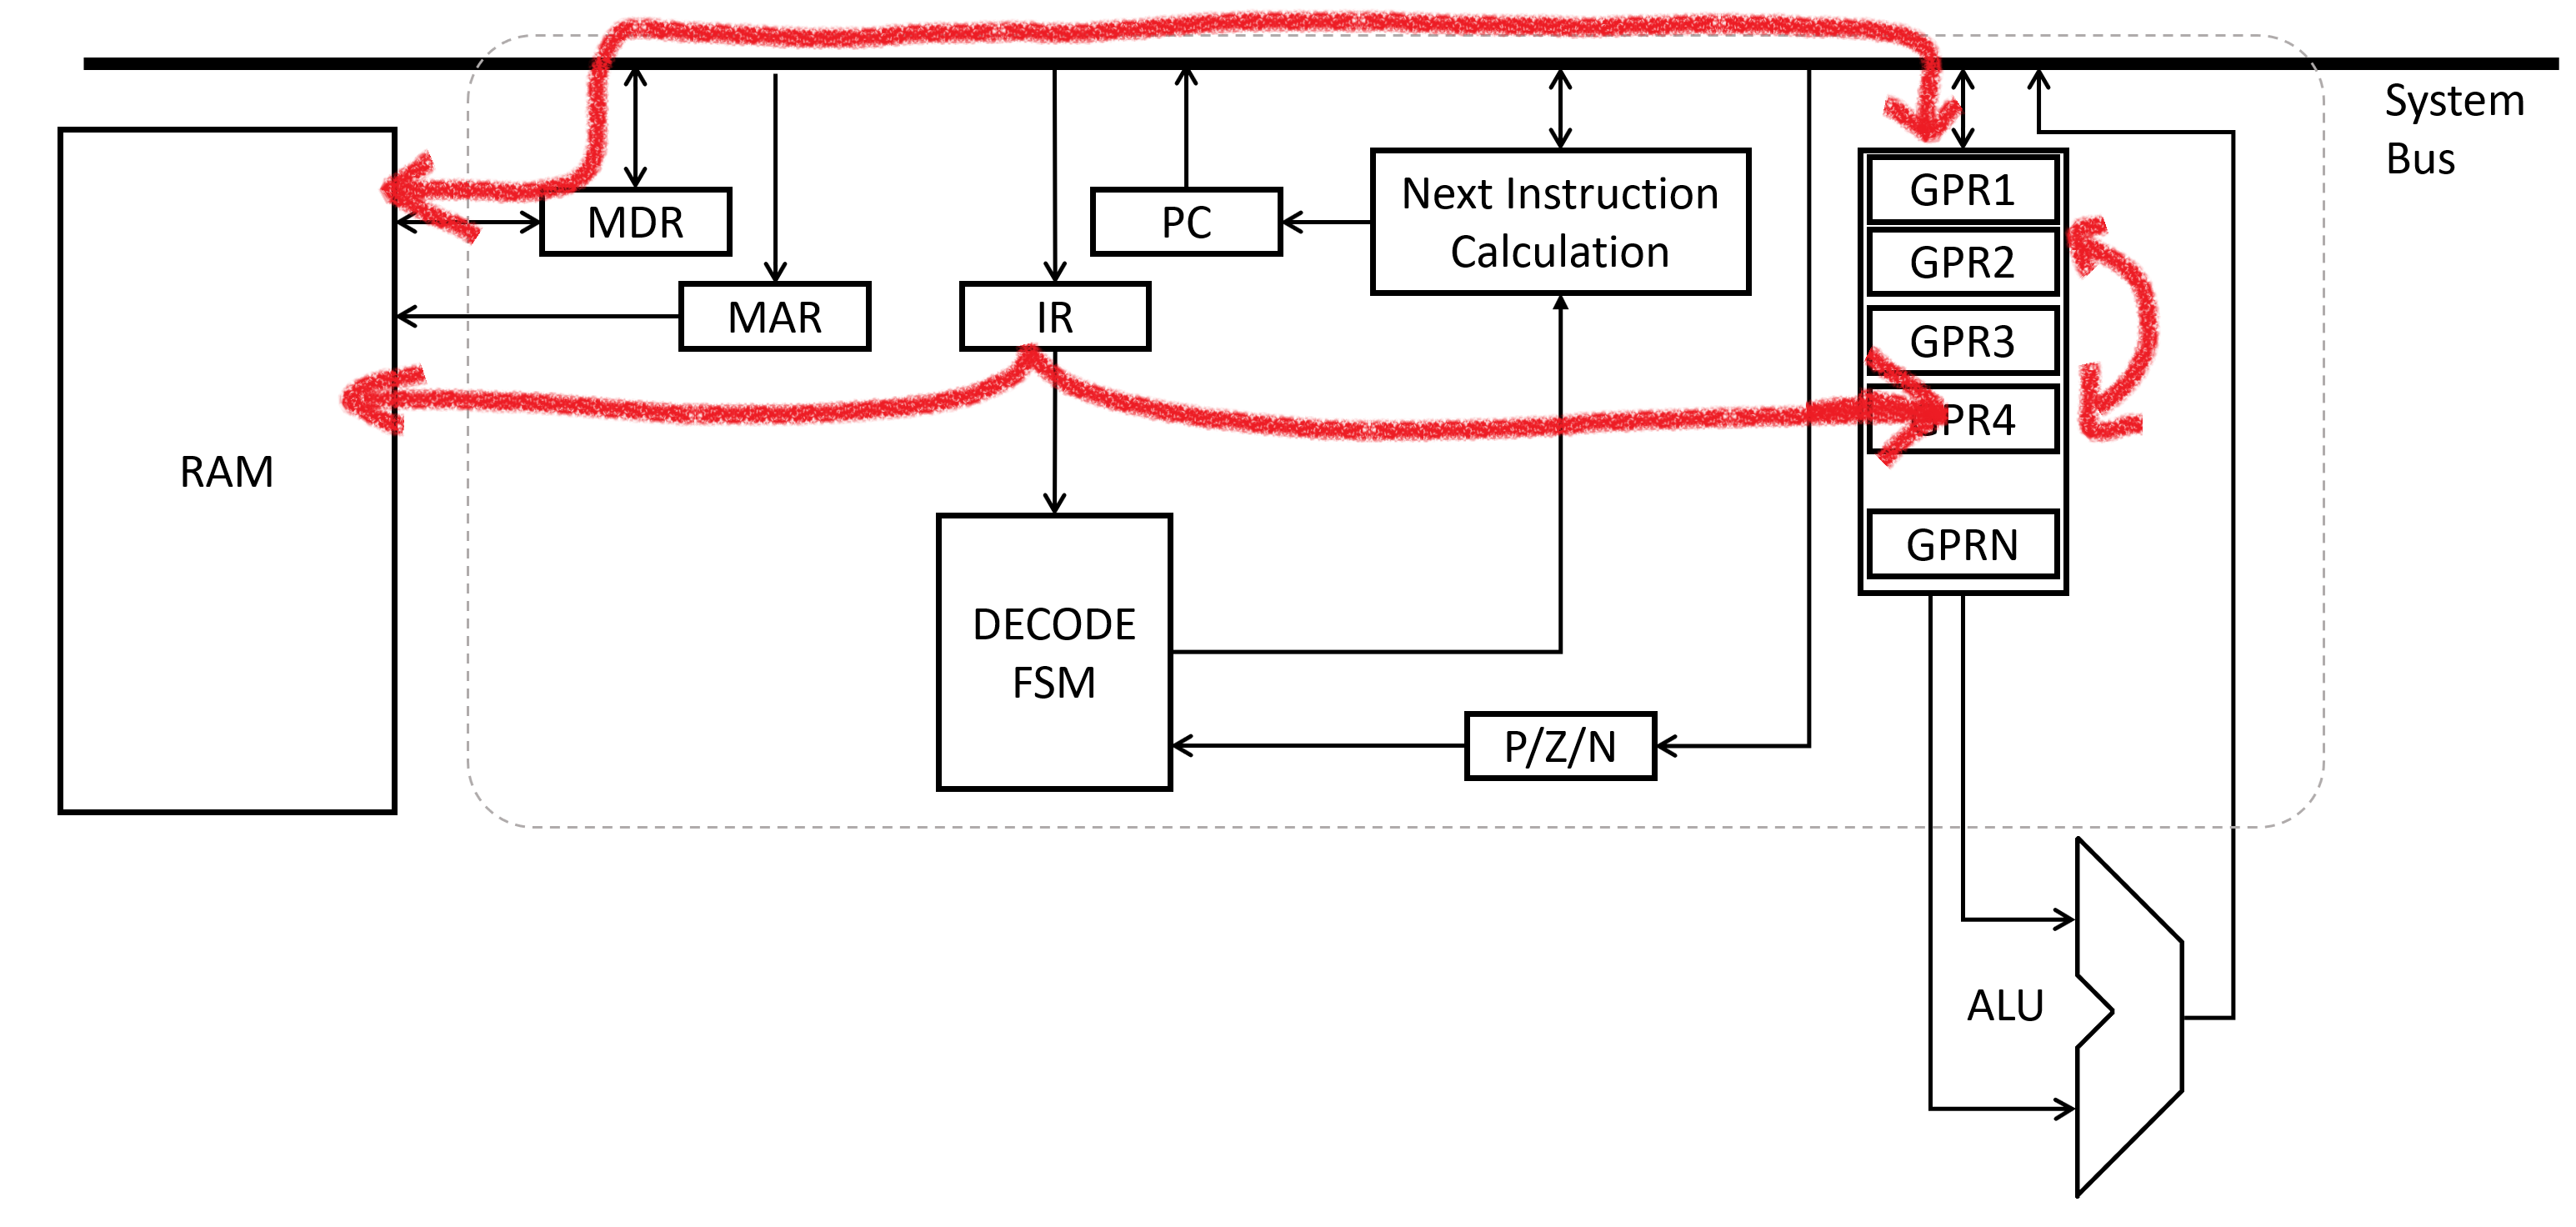
mov is the first assembly instruction we will cover. mov stands for move. It’s the true workhorse of the x86 assembly language. 1 It’s primary job - move values from one place to another. Fundamentally the syntax is:
mov <dst> <src>
It can move constant values into registers or memory, move between registers, or move between registers and memory:
; ----------------------------------------------------------------------------
; sample.asm
; ----------------------------------------------------------------------------

    global  _main

; ----------------------------------------------------------------------------
; Code Starts Here

section .text

_main:
    mov EAX, [myVariable]            ; Move the value at myVariable into EAX
                                     ; EAX now contains 42
    mov EBX, 1234                    ; Move the constant value 1234 into EBX
                                     ; EBX now contains 1234
    mov EDX, EAX                     ; Load EDX with the present value of EAX
                                     ; EDX is now also 42
    mov dword [myOtherVariable], 25  ; Load the constant value 25 into
                                     ;   all 32 of the bits of myOtherVariable
                                     ; The memory allocated at label
                                     ;   "myOtherVariable" now has value 25
    mov ECX, [myOtherVariable]       ; Load ECX with the value from memory
                                     ;   labeled "myOtherVariable"
                                     ; ECX is now also 25

    ; We are done executing - return control to the operating system
    retn

; ----------------------------------------------------------------------------
; Global Variables

section .data
    myVariable      DD 42
    myOtherVariable DD 0xBEEFBEEF
    myBeefVariable  DD 0x0BADBEEF
Note due to hardware restrictions, direct memory-to-memory moves are not allowed. You have to store in a register first.
Similarly to before, .text is a marker to indicate the things which come next are code to be executed.
We’ve also introduced a special label _main to tell the compiler exactly where our code begins. This is required for running this on Windows, so Windows knows how to place our bits into RAM such that they will be executed.
Finally, the final retn instruction is how we say our code is done. It returns from the main function, which returns control to the operating system to clean up as needed and do something else. If you had no operating system, you might use hlt to actually halt the processor.
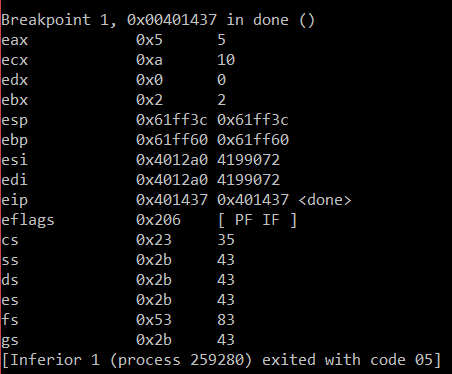
After all this, we can assemble, link, and run the code. Using a special tool (called a debugger), we inspect the results of the registers after our code is run and see the result:
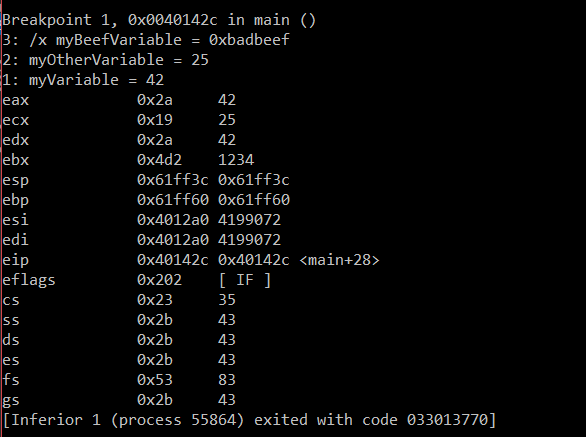
As expected, our variables and registers got updated as promised in the comments! Our new unused variable friend myBeefVariable remains as it was when we started.
Math And Logic
Moving values from here to there is all well and good, but we generally also want to do math on those values.
Fortunately, x86 provides a wide array of math operations for us to choose from. These include, but are not limited to:
addandsub- Adds or Subtracts two valuesimulandidiv- performs integer multiplication or division on two valuesand,or,not- performs bit-wise boolean operations on one or two values.
There are many more, some involving floating point numbers. While super useful they’re beyond the scope of this discussion.
Usually these take two or three operands - <operation> <input1> <input2>. Here, operation is performed on input1 and input2, and the result gets stored back into input1. This is convenient if you are keeping a running total of something, and just requires an extra mov if your destination is different than the inputs.
For example, to add EAX and EBX together, and store the result into ECX, you would provide the assembly code:
mov ECX, EAX  ; Copy first operand into the output location
add ECX, EBX  ; Add the value in ECX (same as EAX) to EBX, storing back into ECX
sub works very similarly. As a worked example:
; ----------------------------------------------------------------------------
; sample.asm
; ----------------------------------------------------------------------------
global _main
; ----------------------------------------------------------------------------
; Code Starts Here
section .text
_main:
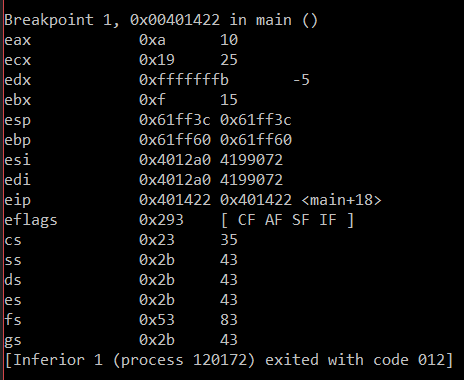
mov EAX, 10 ; Init our inputs with some values
mov EBX, 15
mov ECX, EAX ; Copy first operand into the output location
add ECX, EBX ; Add the value in ECX (same as EAX) to EBX, storing back into ECX
; ECX should be 10+15 = 25
mov EDX, EAX ; Copy first operand into the output location
sub EDX, EBX ; Subtract the value in EDX (same as EAX) from EBX, storing back into EDX
; EDX should be 10-15 = -5
; We are done executing - return control to the operating system
retn
; ----------------------------------------------------------------------------
; Global Variables
section .data
True to the comments, add and subtract operations put the results into ECX and EDX.
Similarly, we can do bitwise logic operations on values. Instructions like and, or, and not do exactly what you’d expect, and follow very similar formatting to our math instruction friends. Yet another worked example of their operation:
; ----------------------------------------------------------------------------
; sample.asm
; ----------------------------------------------------------------------------
global _main
; ----------------------------------------------------------------------------
; Code Starts Here
section .text
_main:
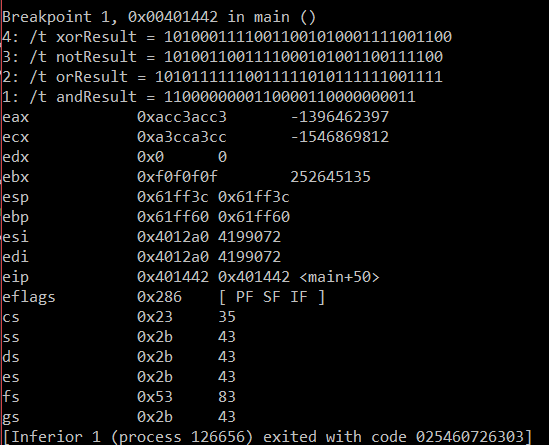
mov EAX, 0b10101100110000111010110011000011 ; Init our inputs
mov EBX, 0b00001111000011110000111100001111 ; Use random-ish 32-bit values
mov ECX, EAX ; Copy first operand into the output location
and ECX, EBX ; Perform bitwise AND on the two values
mov [andResult], ECX ; Store into the global variable for later inspection
mov ECX, EAX ; Copy first operand into the output location
or ECX, EBX ; Perform bitwise OR on the two values
mov [orResult], ECX ; Store into the global variable for later inspection
mov ECX, EAX ; Copy first operand into the output location
not ECX ; Perform bitwise NOT on the first value
mov [notResult], ECX ; Store into the global variable for later inspection
mov ECX, EAX ; Copy first operand into the output location
xor ECX, EBX ; Perform bitwise NOT on the two values
mov [xorResult], ECX ; Store into the global variable for later inspection
; We are done executing - return control to the operating system
retn
; ----------------------------------------------------------------------------
; Global Variables
section .data
andResult DD 0x0
orResult DD 0x0
notResult DD 0x0
xorResult DD 0x0
The bitwise action performs the corresponding logic operation on the two numbers, one bit at a time, never inter-mixing the bits. Despite how painful it is to look at theses 32-bit sequences, the results are what you’d expect:
Conditional Execution
So far our code is very linear in execution - we start at the top, execute all instructions in order, and then we are done. However, to actually make decisions and be more than a glorified calculator, we need to be able to tell the processor to skip or repeat instructions. This functionality is accomplished by the paired set of operations - compare and jump.
cmp, or compare, is probably the easiest to understand. It takes two inputs, and compares them! In x86, the result of the comparison is stored in a very special register that is called the EFLAGS register. On our diagram for processor architecture, we had a “P/N/Z” register that served the same purpose. It is just a set of bits to indicate if the previous operation resulted in overflow or underflow, a positive or negative result, a zero or non-zero result, and a number of other things.
Since cmp sets the EFLAGS register, we can call a jump right after it to use the result.
Jump comes in many different flavors, but all do the same thing - they alter the value of the next-address to be decoded as an instruction. By interrupting the normal “add-one-to-instruction-register” behavior of the processor, it enables you (the user) to change the order of execution.
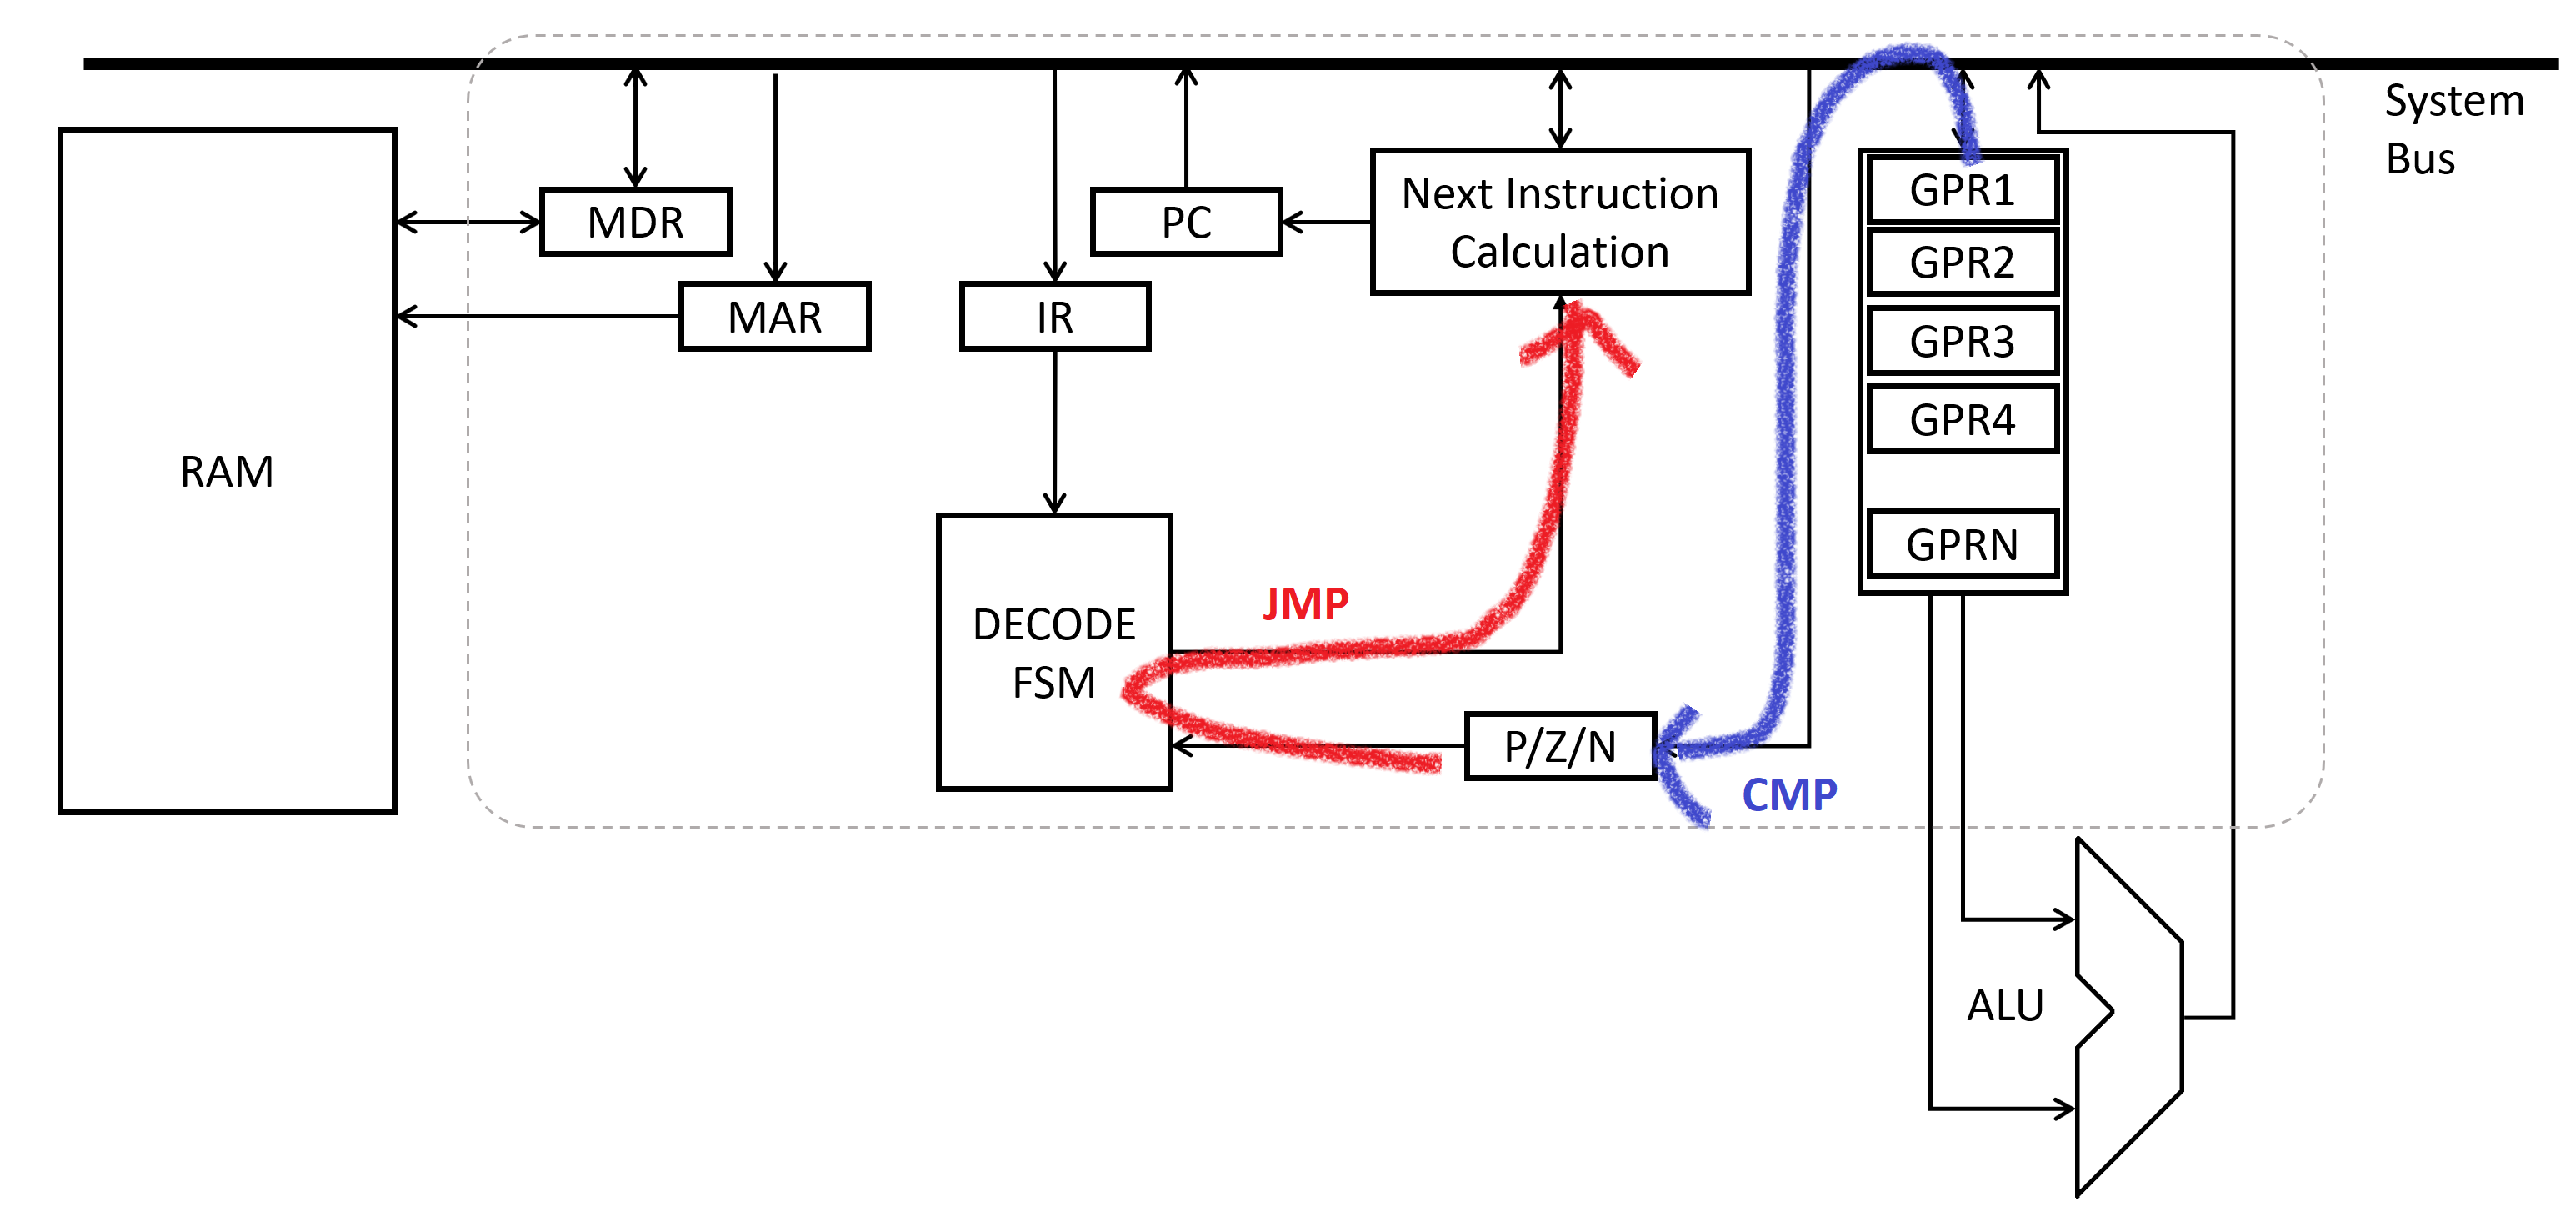
The instruction jmp itself is called an unconditional jump - no matter what EFLAGS is set to, it will always go to the provided memory address. For example, consider the following:
_countBeverage:
    add [numBottlesBeverageOnWall], 0x01  ; put one additional bottle of beverage on the wall
    jmp _countBeverage                    ; do it again.

; ??? ummmmm when do we end?

section .data
    numBottlesBeverageOnWall      DD 0x0 ; Zero beverage to start.
Like that annoying singing brother in the car ride, this code just keeps counting the number of bottles of beverage on the wall. Maybe this is what you wanted to do - doom your machine to an eternity of counting. But, let’s say we want to do something a bit more meaningful….
The other flavors of jump use the value in EFLAGS to conditionally go to the provided memory address. If the condition is not met, the usual “add-one” behavior is kept. The most common flavors are:
je- Jump if Equaljne- Jump if not Equaljl- Jump if less thanjle- Jump if less than or equal tojg- Jump if greater thanjge- Jump if greater than or equal to
Obviously there’s some redundancy here, but it does let your assembly code be more intuitive to look at.
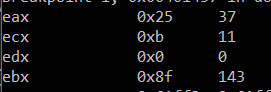
To show how to use these, let’s do a bit of a contrived, but still useful, example. We’ll load numbers into EAX and EBX and compare them. Based on the outcome of the result, we’ll set ECX - using (very convinenetly) 0x0A for “EAX bigger”, 0x0B for “EBX bigger”, and 0xAB for “EAX equals EBX”.
; ----------------------------------------------------------------------------
; sample.asm
; ----------------------------------------------------------------------------

    global  _main

; ----------------------------------------------------------------------------
; Code Starts Here

section .text

_main:
    mov EAX, 0x25  ; Init some values for comparison
    mov EBX, 0x8F

    cmp EAX, EBX   ; Perform the comparison operation of EAX against EBX
    jg  _a_big     ; if EAX was greater, go to section _a_big
    je  _same      ; Otherwise, if equal, go to section _same
    jmp _b_big     ; Otherwise, EBX must have been bigger.

_a_big:
    mov ECX, 0x0A  ; since A was greater, put "A" into ECX
    jmp _done

_b_big:
    mov ECX, 0x0B  ; since B was greater, put "B" into ECX
    jmp _done

_same:
    mov ECX, 0xAB  ; since they were equal, put "AB" into ECX
    jmp _done

_done:
    ; We are done executing - return control to the operating system
    retn
Running this produces the expected output - since , we expect 0x0A in ECX, and that’s what we get:
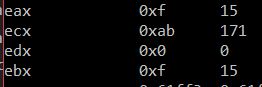
Also as you’d expect - if you tweak the initial values of EAX and EBX, you get different results in ECX:
A couple things of interest in this example: Note that jmp or its flavors do not set EFLAGS, so you can do a “chain” of jump instructions after one cmp instruction as above. Based off of just that one comparison, we branch off to the most-appropriate of the three subsections for manipulating ECX.
Also note that at the end of each small “chunk” where ECX is set, we have an unconditional jmp down to _done. Remember that without jmp calls, assembly instructions happen one after another. The assembler doesn’t know (or care) that we divided our code up with different labels like _a_big or _b_big - it just goes through instructions one after another. Without unconditional jmp _done instructions, we’d potentailyl be setting ECX multiple times, which would be incorrect.
However, the astute reader may be saying “Hey, one of those isn’t actually needed!” and you’re 100% right. In _same, the last jmp _done instruction is totally unnecessary from a functionality point of view.
This chunk of code:
_same:
    mov ECX, 0xAB
    jmp _done
_done:
    retn
Is functionally the exact same thing as:
_same:
    mov ECX, 0xAB
_done:
    retn
Because jumping to the next instruction is, well, exactly what the processor does by default.
HOWEVER. A key component of “good” code usually is consistency. If you have three chunks of code that are supposed to do similar things, you should make them look very similar. Even if it works just fine, removing that jmp _done line forces the next person looking at your code to stop and think “Wait, why is this one different? Is that OK? Is this actually a bug?” and then a little while later come to the same conclusion as the original author did that, no, this still works fine. But, that was just some time that was wasted. Obviously, in a small case like this, it’s pretty easy to see and prove the equivalency. But, as you write more and more (and bigger and bigger) code, making a similar determination is not nearly as trivial. Best practice is to keep similar things as similar as possible.
Finally. It should be noted that lots of other instructions set the EFLAGS register - most math and logic operations, actually. Always check the manual. However, you can use this to skip the cmp instruction sometimes. Doing so will produce smaller and faster code, though sometimes at the loss of readability…. sometimes. Buyer beware.
What We Skipped
Ok, so this should be enough for now - we’ll be able to move on to explain the basics of how C code turns into bits. Of course, there is … a lot … more to x86 than what we’ve discussed here. The biggest thing we’ve left out is how you create chunks of code that can be called from anywhere, and return back where they came from when done (functions, for the folks who know about them already). Suffice to say, x86 has specific built in hardware support for making this happen, and we’ll probably hit it in a later blog post. No matter, it won’t be critical for the immediate discussion.
Similarly, there’s a whole discussion to be had as to how an x86 processor allows certain code to be “privileged” or “unprivileged”, and keeps various chunks of code isolated from each other. We’ve also completely ignored how and why the code we’re writing shows up in “.exe” files, and how said “.exe” file happens to end up with its contents on the processor. These are all inter-related topics, which hopefully we’ll touch on when we discuss how operating systems work. Again suffice to say, it won’t be required to go through now, but keep in mind that the onion still has more layers
Next Steps - Where are we going?
With the end of this post, hopefully we’ve presented a decent introduction to the bare-bones components of x86, a real assembly language that works on real processors. We’ll use this knowledge to help deconstruct how our high level language (C code) gets converted to 1’s and 0’s on a processor, with x86 assembly as the intermediate description of the bits. Check out the last chapter here!
-
When I say workhorse, I really do mean it works hard, and can do a lot! Turns out,
movby itself is Turing Complete. That’s right, you could build a computer that only know how to domov, or limit yourself to only usingmov, and still be able to compute anything you want to. And even more so, someone did it. Seriously, this is one of my favorite exercises in all of computer science, just for its simultaneous absurdity and technical prowess. The video is long, but actually worthwhile, and totally approachable to someone who has kept pace with this blog thus far! ↩