
Introduction
This is largely a story of discovery on my part. For the 2019 season, we introduced Discord as an alternate communication form - primarily because I wanted a way to share web links with the software team without having them re-type the exact address after looking at my computer screen. It kinda snowballed - for whatever reason, unlike Slack, students actually used it on a day to day basis. This started encouraging out-of-meeting conversations and generally lifting productivity. We started rolling it out to the whole team in prep for the 2020 season, with continued great success.
One of my absolute favorite things about Discord is the voice channel concept - the seamless, easy, fairly low-latency call-in ability is the best I’ve seen. As we were rolling it out, a fun side project idea came up - to investigate a way to get or make a conference room phone for the voice channel.
Design Phase
The goal I had in mind: Provide a single-button-push way to do 2-way audio in the warehouse, to whomever else wanted to talk. If the purpose of Discord was to increase communication, and we wanted voice to be a part of that, we needed the most trivial way to ensure people made the voice connection. No pulling a laptop out, logging in, plugging in…. just something that would sit on a table, always ready, and just needs a single button push to create sweet sweet voice sounds.
Given we didn’t have something like this yet, we’d either need to purchase or make something.
Existing Product Survey
The first step when solving a problem, generally, is to investigate if someone else has solved it already.
A few days of google searching revealed this wasn’t the case, at least not for what we wanted. There’s plenty of conference room phone solutions, but most require either a laptop, or some sort VOIP infrastructure. The latter was appealing from the always-present perspective, but was complex to set up. Most of the good-looking systems were somewhat proprietary and costly, and none had built-in Discord voice integration.
It was quickly apparent that to get what we wanted, we’d have to roll up our sleeves and get to work.
Technological Options
Once we knew we were going to do a customized solution, and not just purchase a pre-made one, the next step was to break down the problem
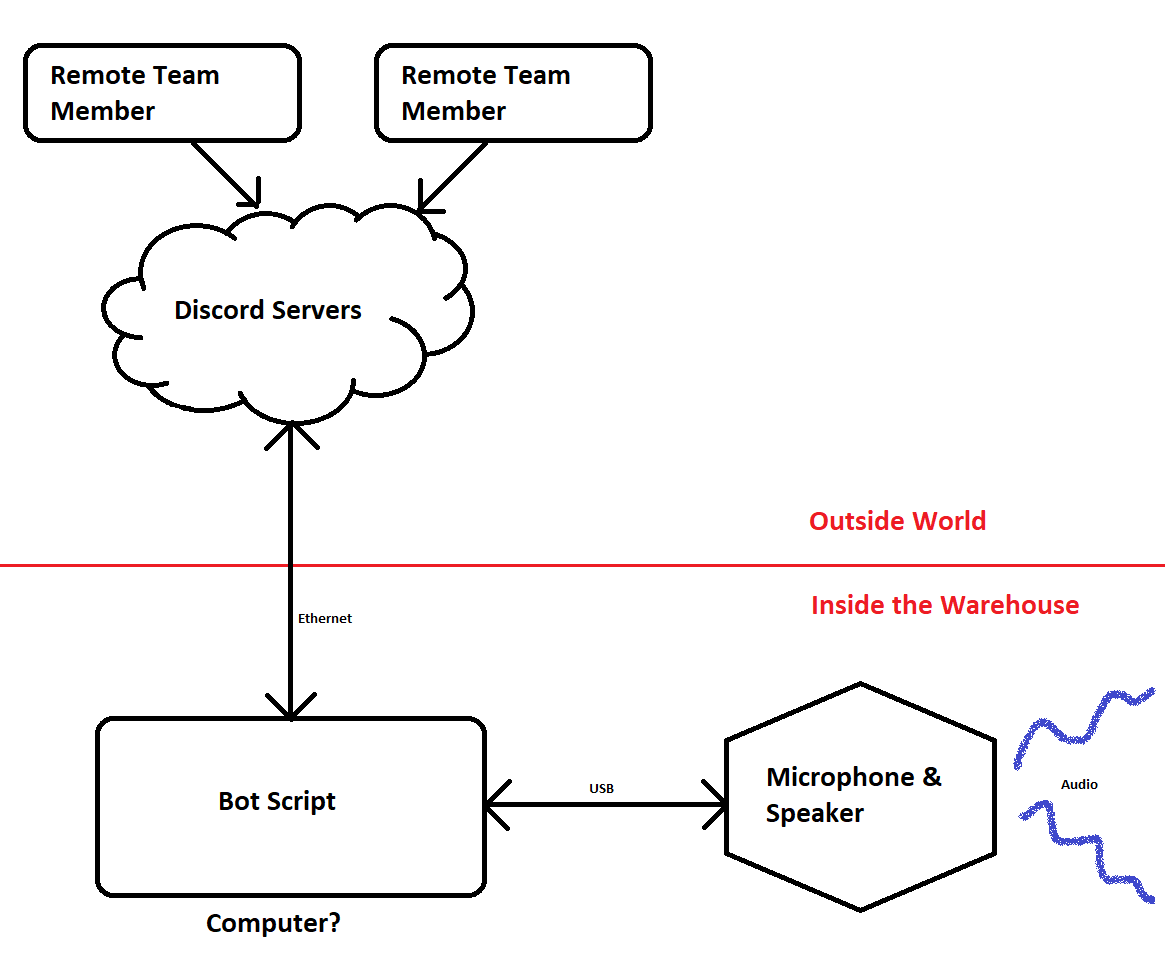
There were two major things to solve:
- Hardware to record and play-back audio
- Automation to connect to Discord’s servers to that hardware
The final solution ended up smearing these problems back together. But at least to start, we approached them separately.
The Audio Hardware
A big concern was ensuring we wouldn’t get feedback between whatever loudspeaker and microphone we used. Not wanting to create this echo-cancellation ourselves, we opted right away to choose hardware with it built in. This trimmed down the audio hardware options, and led us toward hardware boxes specifically designed toward corporate conference rooms.
These audio devices all have the same basic features - a joined microphone and speaker, some echo cancellation logic and design between them, a handful of buttons for controlling volume and call, etc. They fell into two major categories: Ones designed to connect straight to a PC (usually via USB), and ones that connect to a central VOIP server.
VOIP seemed pretty slick, but it was expensive and came with a decent amount of configuration overhead. It’s usually targeted at large corporate environment where there are many conference rooms linked. Our design only planned for one audio gathering/broadcasting location, with no expansion ability needed. USB appeared much simpler to deal with.
Ultimately, ebay browsing revealed a used Revolabs/Yamaha FLX 1500 which was missing some cables, but apparently “tested functional”, for $15. Given that most of the basic USB conference phone solutions start around $75, and the FLX 1500 is close to $250 new, it seemed like a good deal.
For $15, I was willing to risk buying a brick.
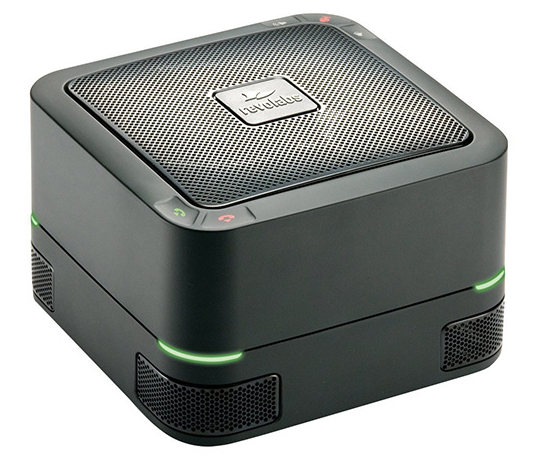
Good news - it paid off! With proper cables, unit powered up and worked just fine. And just like that, our hardware solution was chosen.
The Automation
When it comes to connecting with Discord, there’s basically one way to do it. Go through their official API. To connect without needing someone’s personal login, the “headless” method involves creating a Bot and authorizing it on your server. So, from that perspective, the “Discord Bot” solution was pretty much the only answer.
However, such a bot still needs control logic behind it to have it make decisions. Discord’s API lets you send and receive data, but it’s on you to decide what to do with the received data, and generate the data to send. Doing so involves, happily, writing some software!
The usual way this happens: Some kind soul will read through the API documentation, and provide a nice library in a specific programming language to let you interact with it nicely (rather than decoding and constructing the web traffic of the API yourself). Discord has quite a few of these, it really just depends on which language you want to use to implement the rest of your app. Given my familarity with Python, the known need to interact with other PC things, and vast amount of other available libraries, discord.py was chosen, and the application would get written in Python.
Of course, you still need some form of a computer to run your program on. On Casserole, we currently have a mentor who freely donates lightly used Raspberry Pi 3b’s. So, at the moment, if anything can be done on a Raspberry Pi, we usually try to start there. Raspberry Pi with Raspbian it is then.
Implementation Phase
Time to get down to work!
The Basics - Building a Bot
Account Creation
Building a Discord Bot isn’t actually all that bad. People like to do it a lot, so lots of folks have created some decent tutorials on the topic. A quick google search returned at least three pages of good tutorials by others - so, I’m not looking to cover the general process here. For those interested, here’s the guide I followed.
The super basics - First you have to create your bot’s account on the Discord side, kinda like a new user. The “bot” is actually the script you’re running, but the Discord server needs to know the bot exists first.
This account creation results in two things: One is a secret key the bot script needs to authenticate with the servers. The second is that you can now go to your Discord server, invite the bot, and give it permissions and roles like any other user.
As a side note - keep the secret key secret. Legit man. Anyone who has this key can connect to discord as your bot. It’s like giving out your username and password to someone. Don’t post it to Github, anywhere, any time.
Basic Scripting
As mentioned, we used Discord.py to write the logic of the bot’s script. This library uses a fairly new feature in python called asyncio to do concurrent processing with web-requests. This is generally a good thing - interacting with web servers tends to be a pretty event-driven, asynchronous activity. Messages come in whenever they do, and you want to process them as soon as they come in. You’ll generate packets in the background, and need to send them whenever ready. I think it was the right design choice for the library. The only downside is that I had to learn it from scratch. Whoops.
Good thing there are good tutorials out there.
I ultimately ended up scripting in a way that allowed me to leverage the asyncio features as needed, but write the bulk of the scripting in a format I was more familiar with. Probably not the best answer, but seems to be getting the job done for now.
The main entry point for our bot’s logic is in this file - casseroleBot.py. Like most python, the main code is all the way at the bottom. It doesn’t do much - it just instantiates the bot, and starts it running.
Basic Bot Functionality
The CasseroleDiscordBotClient class is where most of the main action happens. All the complexity of interacting with the server API is done within the discord.py library. We just provide a few standard hooks.
on_ready() is our hook which gets called when the server connection is successful. For us, it just sets a global flag, letting all the other parts of code know they can interact with the server as needed.
on_message() is our hook for processing all messages sent on all channels on the server. Usually the bot does nothing. However, if the message begins with $, or the bot’s name is mentioned anywhere in the message, the text is stripped and parsed.
Based on the stripped text, we’ll do one of a few things. Certain specific strings like callin or hangup are interpreted as commands to connect to or disconnect from the voice channel - this enables remote users to turn on the phone, in case someone at the shop forgets to hit the button. help prints some useful info, and reboot lets us remotely restart the Raspberry Pi.
Voice Channel Interaction
There was a key gap we missed while picking Python as the implementation language - the default Discord Python library does not expose the ability to receive audio from discord. Pretty big gap, right?
The good news - we found that someone had forked the python API to add the feature. It’s still in development and has been clearly marked as “DO NOT USE IN PRODUCTION”. But, since this is just for a casual volunteer project, with no real money riding on it, I chose not to heed the warning. We pulled the fork into our application, and have been using it without issue.
The script architecture is broken up into a few parts:
Discord Server Interaction
These are all the async methods, directly responsible for talking to and from the server. We’ve described most of them above.
Global State Variables
These are a set of class-scoped variables that indicate the desired state of the bot. Things like whether it’s called into a voice channel, on hold, etc. This state can be commanded from a DIscord message, from physical buttons on the speaker, via a GUI (sometimes)… maybe other places in the future. Therefor, there has to be a way that the async portions of the server interaction can gather inputs from outside the async realm.
To facilitate this, the periodicStateCheck() method is scheduled within the async area to run a few times a second. It checks the global state commands to see if any have changed since the last time it checked. If any have, it performs the server actions necessary to execute the state change, and then flips the actual state over to match.
In this way, periodicStateCheck() is a bridge between the async world of the Discord server, and the synchronous & procedural world of the rest of the scripting.
Audio Handling Classes
These are sources and sinks for audio. They’re the building blocks for interacting with a Discord Voice channels.
When working with a Voice Channel, the Discord.py API requires you provide it an audio source and sink. The source is simply a class which can provide 20ms chunks of PCM audio data whenever requested. A sink is the mirror: It’s a class which will be regularly provided with 20ms chunks of PCM audio data.
When implementing a source, we have to generate that audio data from somewhere. Similarly, when working with a sink, we have to take the given data and do something with it.
On the source side, we actually implemented two different sources. MicrophoneAudioSource() is the audio source that reads data from the USB microphone via the python-sounddevice library, and returns it as the 20ms chunks. WaveFileAudioSource() does similarly, but instead sources from a .wav file on disk.
Normally, MicrophoneAudioSource() is configured to be the audio Source for the voice channel. However, when we want to put the call on “hold”, we switch to using WaveFileAudioSource(). This prevents microphone data from being broadcast to Discord, and instead plays some nice music.
There’s only one audio sink currently, SpeakerAudioSink(). It also uses python-sounddevice to transmit any audio packets to the default audio device on the system, which happens to be the USB conference room speaker we have hooked up.
Interacting with an Audio Device
As mentioned, we’re using python-sounddevice as the library to do audio interaction. It’s actually fairly nice, using Linux’s abstractions to prevent the need to interact directly with the audio hardware. As long as we configure the device we want to use as the Raspberry Pi’s default audio device, python-sounddevice handles the rest.
It was also nice that I could configure python-sounddevice to work with PCM audio at 48KHz, 16 bits, to match the Discord API exactly. This meant we didn’t have to do any weird re-sampling of audio while exchanging between the API and the hardware device.
Nuances of the Discord API
The biggest roadblock we hit while implementing the audio interaction was on the Audio Sink. The Discord API returns an independent audio stream per connected user.
So, if one other person is on the call with you, that’s ok - you get one stream, and send it to the speaker.
However, if you have two people, you get two streams. You have to mix the two together prior to sending to the speaker.
Mixing becomes non-trivial pretty quickly. Aside from the fact that mixing digital audio is just plain hard in the first place, you also have to do it in real-time, accounting for missing or incorrectly ordered packets, in python (which isn’t the fastest or best language for bit-level manipulation on the block).
After a lot of experimentation, I ended up at a not-very-robust but workable answer:
- Use Numpy for speed of integer addition - base python couldn’t get it done fast enough.
- Maintain a “buffer” of the current 20ms audio that is soon to be sent to the speaker.
- Receive each packet from all streams (all tagged with the sending user).
- Check if the buffer already has an audio packet from that user.
- If so, send the buffer to the speaker, zero it out, and then add the packet to the buffer
- Otherwise, just add the packet to the buffer.
- Record that the packet has data from that speaker.
- Wait for the next packet and repeat.
This has a number of limitations - it will clip very easily if everyone screams at the same time. It will also not account for out-of-order or missing packets very well. It assumes users are sending data in a synchronized fashion.
For general use-cases, I really wouldn’t recommend doing this. However, for our “good enough for a $15 project” use case, it’s been getting us by so far. The implementation can all be seen in the SpeakerAudioSink class.
Interacting with a Human Interface Device
Using python-sounddevice provided a good way to access the audio portion of our Revolabs FLX 1500, but didn’t cover how the buttons on the top worked. I’d initially intended to just use a small touchscreen or physical buttons to do the call/hangup operation. However, given that there were already some buttons on the device we were using, I figured, “how hard could it be to get these to work?” Ha.
I didn’t know the first thing about HID devices, other than that they existed. I had to learn a bunch along the way. What follows is an under-educated conglomeration of research over a fast day of experimentation and debugging.
Every USB device you plug into your computer has to tell the computer what it’s capable of. Especially if it’s not just a mouse or a keyboard, there are a ton of protocols around how the device tells the computer what it is and what it can do. In the attempt to make things as… universal… as possible, a ton of device capabilities are pre-defined. This flexibility comes at a cost - implementing software to properly handle any and all of these inputs is difficult, to say the least.
Dumping the device’s capabilities using Linux utilities revealed a handful of interesting things. For one, the volume and mute buttons were mapped to the standard HID device definitions, which was good. Three out of the five buttons were trivial.
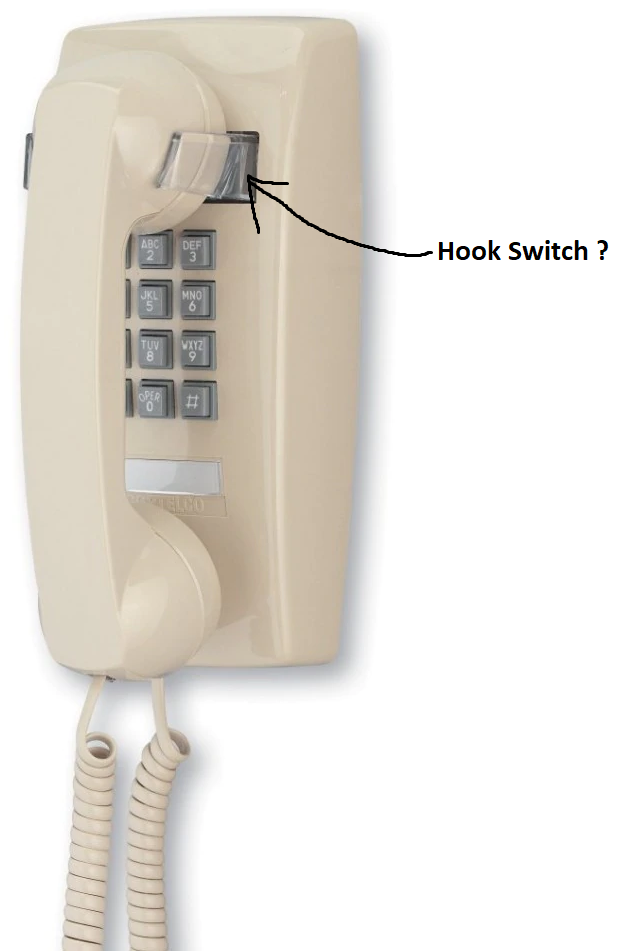
The device reported to also have some ability to control the LED’s, as well as read and set the “hook switch”, which I can only presume maps to the switch on phones which you used to have to physically hang back up on a wall when you were done using them. From what I understand, “flash switch” was also a basic way to tap this switch once, ending the current call and prepping for the next one.
I was hopeful, because things like this seemed to imply there was some way to get the info out of the device.
Alas, that was not to be. The device also listed a slew of the proprietary, manufacturer-only capabilities, which have no formal definition for what the bits received under those descriptors implies. After connecting to the device and playing around a bunch with the buttons, I could only make one of them generate any bits, and they were all proprietary. Even the mute button didn’t respond on the standard USB api’s, but on some weird proprietary descriptor.
So, rather than implementing proper USB handling, I fell back on hacking and reverse engineering. Rather than write a full USB HID driver in python (eeew), I opted to assume that we run on linux, and attempt to interact with the /dev/usb/hiddev0 file, a special linux kernel file that abstracts the HID device. The path is hard-coded, since we don’t have anything else hooked up to the box’s USB ports at the moment.
It appeared everything was sent in 8 byte chunks - 4 bytes of header to describe the data, and 4 bytes of actual data value. After fiddling about for the headers I care about, I parsed those out of the data stream, and extract the values to represent the meaningful state I care about. The implementation can be seen here.
As mentioned, I don’t have any documentation on what all these proprietary headers are used for, or how I’m supposed to interact with them to configure the device. It doesn’t seem to be anywhere online.
I do have a guess as to why this is. All that follows in this section is that guess, but not something I know for sure.
If you look at the manual for the FLX series, you’ll notice this confusing table:
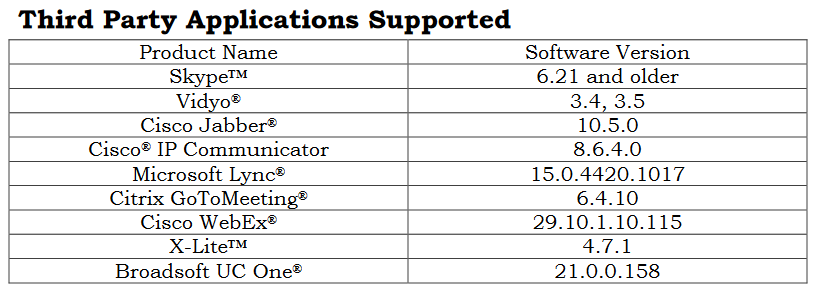
Why in the world does a universal serial bus device have a list of supported applications? Shouldn’t it be universal?
As mentioned, a piece of software supporting every permutation of USB feature set would be really hard to get right. It would inevitably not work with some pieces of hardware, which frustrates users, and reduces their desire to purchase more products from the company.
Consider as well your average corporate purchaser of a conference room phone. Time is money. Assume you have five engineers in a conference room, each getting paid $50/hour.
If they have to spend five minutes at the start of each meeting debugging their phone, even that small amount of time adds up - by my numbers, about $21 per meeting.
Even if your company only has 10 meetings per week in that room (which is an incredibly low estimate), you’re still burning about $10,000/year on buggy conference phones.
It would be trivial to justify buying a $5000 device, as long as you could prove it just works.
TL;DR - Corporate purchasers will pay through the nose to get “just works” functionality.
Given this as their primary purchaser base, I think Revolabs made an engineering decision to drive sales in a particular market. Move your more advanced functionalities (beyond basic audio & volume) onto proprietary parts of the USB spec. Work one-on-one with a select set of popular corporate software vendors to ensure seamless integration of the product. Revolabs gets to publish a list of software they are confident they “just work” with. Other software companies get to say Revolabs hardware “just works” with their software.
Corporate purchasers see both lists and purchase both products. Even at the expense of openness and flexibility and cost, they get their “just works” functionality, which is far more valuable.
Now, I’m not saying this is good or bad in general. Clearly, the numbers work out for corporate purchasers (who also happen to pay my paycheck and fund our robotics team).
I suppose it’s more rough on us open-source hackers and tinkerers, but that’s more my own fault for choosing a closed-source piece of hardware. And, to be fair, the audio works super well, and I’ve got most of the buttons I care about working in some fashion. Given I paid $15 total for this project, I really can’t ask for much. You do get what you pay for.
Scope Creep - Expanding Feature Set
Of course, stopping at this conference phone idea wasn’t good enough. We had a whole sandbox to play in now! The possibilities!
Usually I hate scope creep. But, it is fun to tinker. We’re keeping development constrained behind sufficient criteria to ensure we don’t lose the useful features, while exploring some new ones.
Current
Cheering
If you didn’t know 1736 has a history of award-winning cheering sections. It is only fitting that our Discord Bot participates as well.
CheerHandler() is where the magic happens for now. An abstracted call/response cheer handler is implemented, along with some regex parsing & stateful “Give me a */What does that spell?” cheer.
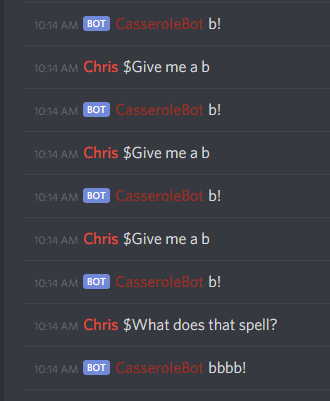
Silly as it may be, it’s actually an awesome exercise string parsing with regular expressions, with a fun twist.
Markov Chain Responses
I’ve always been amused by Markov Chain Bots - They can get a bit boring, but every now and then they produce some real gems.
For those who don’t know, a Markov Chain is a statistics model which looks at the sequential probabilities of events. If you consider the “choice of a word in a sentence” as an event, a Markov Chain bot can generate “new” sentences based on most-likely combinations of other sentences.
An overly-simplified explanation of this:
- Get a bunch of sentences
- Break every sentence into chunks of words. I choose chunks of 4 words for this example.
- Analyze all the sentences to see, given three previous words, how likely is the fourth one?
- Assemble a probability data structure to describe this “given three previous words, how likely is this word?”
- Use the data structure to generate new sentences.
In step 5, you can get a bit creative - you want to pick words randomly, but not too randomly. You use your probability data structure to skew the randomness toward “likely sentences”.
Furthermore, if you know the language of the sentences (like English), you can incorporate a “parts of speech” tagger into the mix. At steps 3 and 5, you use an algorithm from Natural Language Processing to identify what words are nouns, verbs, etc. This further increases the accuracy of your probability model, leading to more natural generated sentences.
I leveraged two python libraries to accomplish these goals. They covered all the major technical work, so I didn’t have to implement the above algorithms myself - simply use them. Markovify is a python library explicitly designed for this text-based Markov model training and regurgitation exercise. Originally developed at BuzzFeed, it’s used by a number of similar projects. Additionally, I hooked Markovify using NLTK to build the parts-of-speech tagging into the model.
The real fun of a Markov model - choosing the sentences to get for step 1. It’s what directly impacts what comes out at step 5. If you put in the Complete works of William Shakespeare, you get Shakespeare-like sentences. If you put in the text of every Star Wars movie, you’ll get Star Wars-sounding quotes from a movie that doesn’t exist yet.
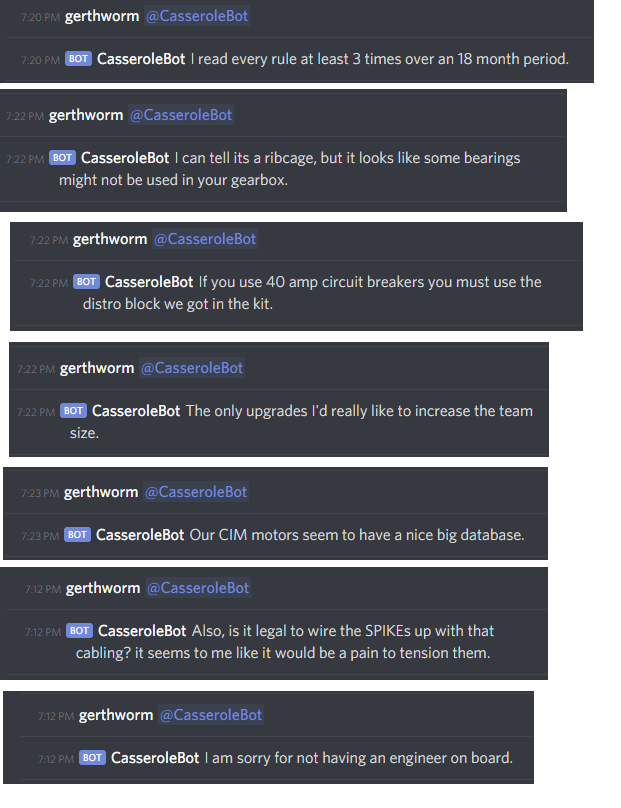
If you put in ChiefDelphi posts, you’ll get something that sounds vaguely like people talking about FIRST robotics. This is a robotics Discord bot, so why not make it talk about robots?
The implementation was split into three phases:
First, I ripped about 6,000 posts from chiefDelphi.com. This code is in chiefDelphi.py. I did it in a number of chunks (see constants on line 16), using PyDiscourse to simplify interaction with the server. I injected a 0.25 second pause between each post querey to attempt to keep the server load down. Still, apologies to Brandon Martus for making his server somewhat sad on certain evenings in early November 2019. After a bit of in-script cleanup and manual find/replace magic on the resulting text file, I had about 3 MB of sentences to train the bot.
Second, in just a handful of lines of python, I converted that 3MB of training material into 24MB of a json probability model of how robotics people talk.
Finally, the main discord bot was updated to parses this model into RAM and generate short sentence responses when it has nothing else to say in response. It’s not exactly conversational, but it is funny.
Finally, it is worthwhile noting that Markovify explicitly ensures it’s not just re-generating sentences that were in its original database - ie, sentences are actually unique and new. If it can’t accomplish this within a certain number of attempts, it gives up. To handle this, we’ve just got some fixed text to return if “all else fails”.
How useful was this? Not very. How fun was it? Quite.
The Blue Alliance
Finally, one of the slightly useful features - we did add a Blue Alliance connection. Currently, all it does is look up team names by their number. But, perhaps more to come in the future, especially if we integrate this with a scouting system.
Future
The plans going forward? Who knows…. Lots of students have experience developing in this environment, so I’m looking forward to ideas. One in flight is using Fuzzy string matching to make the input format a bit less rigid and more conversational. Another might be to use it as a repository to store and retrieve scouting data.
The biggest thing we have available now - an always-on, text-based-interface into a computer with GPIO’s, physically located inside our build space and its network. That… opens a lot of doors.
Conclusion
Hopefully this gives you a bit of an overview as to what we’re doing with our Discord platform at the moment! It also should indicate why I’ve been without a blog post for a while (writing software takes time!).