Introduction
A mentor from Team 2102 had a great suggestion on how to re-work the electronics section to introduce things from a digital-first perspective. This post is a result of that rework, plus some extra facts I find useful.
A Brief History
Doing digital electronics fundamentally requires devices that have discrete states - on and off. Resistors, Capacitors, Inductors, and the like are called linear electronic devices because, simply put, they do not have on/off states. They transition smoothly from one voltage/current operation point to another, usually in a very linear fashion (if you look at the right variables).
Compare this with a light switch in your house - it has no in-between states. As you slide it from the up position to the down position, the state rapidly changes between on and off at some point (defined by the mechanical construction of the inner components). This is the sort of behavior a system that works with 1’s and 0’s exclusively will need to do calculation.
The earliest of electronic calculating machines used electronic relays. Just like the Vex Spike double relay you may be familiar with - these are simple devices that switch an output on and off in response to an input voltage. The input voltage generates a small magnetic field in a coil of wire, which mechanically moves contacts from one position to another, completing or breaking a circuit. It’s just a switch that can be turned on and off with electricity.
Relays have their faults - the coils can get very power hungry and dissipate a lot of energy as heat. Additionally, the presence of moving parts is always a source of failure, and relays can be unreliable. Additionally, the fact that a mechanism has to physically move from one location to another makes them relatively slow - to increase the speed you have to increase the forces on the mechanism, which leads to less reliability and even more power consumption.
The next development was the invention of the vacuum tube. These little devices used heated metal grids to get electrons to flow from one point to another, within a near-airless environment in a glass tube. By carefully changing voltages on plates and aligning them in just the right way, you could use a very small control signal to turn on and off a larger current flow (very similar to a relay). Though also useful as amplifiers, they were easy to use as switches that can be turned on and off with electricity.
Again though, there were disadvantages. Although switching speeds were vastly increased over mechanical relays, the glass-vacuum setup made them physically fragile. Just like light-bulbs, the glass could crack, or the internals could short out and break. Additionally, the heater element required lots of energy, and took time to “warm up” before it could be used. Still, they were practical enough that many early computers were designed and built with them.
The Transistor was the next development. Three gentlemen were awarded the nobel prize for inventing the “solid state” device to control current. Gone were the days of mechanical monsters or fragile glass tubes - their device was a simple hunk of specially-treated material with some wires coming out. Equal parts engineering and hard scientific research, Bell Labs and various universities rapidly developed the first prototypes into commercially marketable products, which in turn made them all the more common-place (and therefor cheap).

Modern processors aren’t even built out of manufactured transistors anymore - the circuit chip is made up of transistors, and lots of other components, but all are created with a photomicrography process that literally eteches the components into a monolithic piece of silicon. But that’s a topic for a future post…
For now, let’s delve into the materials used inside of the transistor to explain a bit about its functionality.
Semiconductors
Of particular interest to computer engineers is a very particular class of materials called Semiconductors These materials have the ability to change between conductor and insulator depending on how voltages are applied to them.
Physical Construction
Semiconductors are primarily made of specially processed silicon, formed into a very regular lattice-like structure on the atomic level, then carefully “doped” with impurities that introduce mobile charged particles. These can be actual electrons, or a void where an electron could fit in (called a “hole”), which is effectively a positive charge carrier.
Remember that a conductor has free particles to carry charge, while insulators do not. Undoped silicon is effectively an insulator, because all electrons are tightly bound into the lattice. Doped silicon does have extra electrons (or holes) which can move around, as they are not tightly bound to the lattice, and are therefor effectively conductors.
Layers of differently-doped material are fused in specific physical configurations to construct useful devices.
When a doped region with extra electrons is fused to a doped region with holes, some electrons naturally migrate into the holes near the junction. This forms what is called the “depletion layer” near the junction. This depletion layer is effectively an insulator, since there are no free electrons to carry current through the region.
Electrical Properties
Applying a voltage across this depletion region will exert an extra force on the electrons. Depending on the direction of the voltage, you may end up with more electrons hopping into holes (expanding the depletion region), or knocking electrons out of holes (shrinking the depletion region). As the voltage gets big enough to drive the depletion region to near zero size, the resistance of the material goes down, and it transforms into a conductor overall.
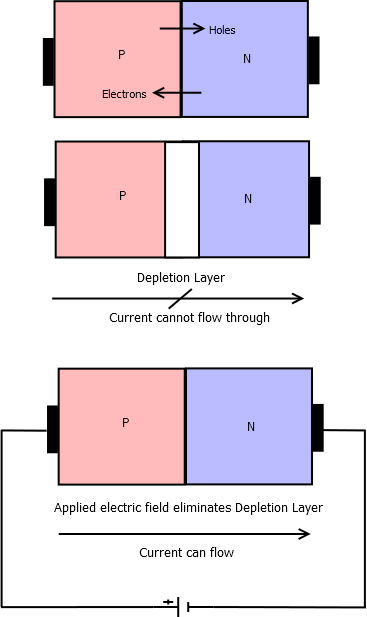
This is the useful property of semiconductors - by applying a voltage to one part, the material property can be converted between insulator and conductor.
Transistor as a Switch
It is commonly said that computers store information using 1’s and 0’s. These “bits” of information are represented inside the circuitry of the processor as high and low voltages. To store, combine, and manipulate the information, it is necessary to have circutry which can manipulate the high and low voltages dynamically.
Transistors contain 3 or more regions of semiconductor material. The simplest type have what is referred to as a Base, Collector, and Emitter region.
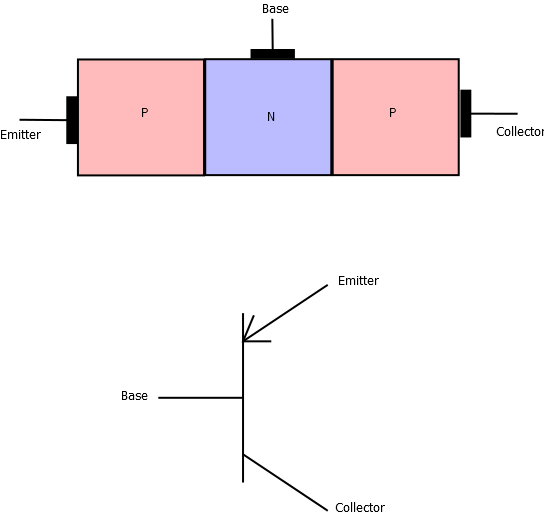
Usually the line diagram with the “arrow pointing in” is used to represent the transistor in schematics.
By injecting a voltage (and tiny current) at the base, the motion of electrons causes an avalanche effect if the collector & emitter have a voltage across them. The tiny input force causes a much larger output force, though it saturates at a certain point. This association allows one electrical signal to impact the flow of another signal, much as a human turning a light switch on and off impacts the flow of electricity to a lamp.
This switching action of the transistor is the basis upon which information can be manipulated. By carefully combining transistors, along with small numbers of other components, basic “logic gates” can be built up. These rudamentory gates have one or more inputs, and a single output, and computer boolean operations like AND, OR, and NOT with electronics.
The exact construction of logic gates from transistors is beyond the scope of this blog because, indeed, learning about how it actually works requires a much deeper dive into the various types of transistors available. In my opinion, this is a topic better suited for folks interested in designing processor circuitry, rather than writing software. For the curious, HyperPhysics has some examples of how gates can be constructed from the BJT transistors we have explained already.
Therefor, we make the following two abstractions:
- A transistor is a device which controls the flow of electricity
- Transistors can be combined to build logic gates, which implement basic logic functions
Just remember these two, and you’ll be fine going forward!
Next Steps - Where are we going?
We’ve scratched the surface of Analog, and shown how you can start to go Digital. If you haven’t yet, go lay the groundwork of some basic Digital concepts with Binary.