Introduction
In this final installment of our series on Control Theory, we’ll walk through the details of tuning a PID algorithm. We’ll cover the most common case in FRC - controlling the rotational velocity of a mechanism with a motor (like our shooter wheel, or a drivetrain).
Shooter Wheel System Tuning
We’ll start by going over how to properly tune our old friend, the shooter wheel.
System Review
If you haven’t gone through the other blog posts, it would definitely be good to check out Part 1, Part 2, and Part 3 to get some basic understanding of the whole control theory thing we’re describing. But in case you didn’t, know that we’re tuning a shooter wheel, powered by a motor, attempting to get it to a certain rotational velocity prior to injecting a ball to launch.
The mathematical model for how this system works is described by this equation:
For visualization and intuition, we dump a test input into the system:
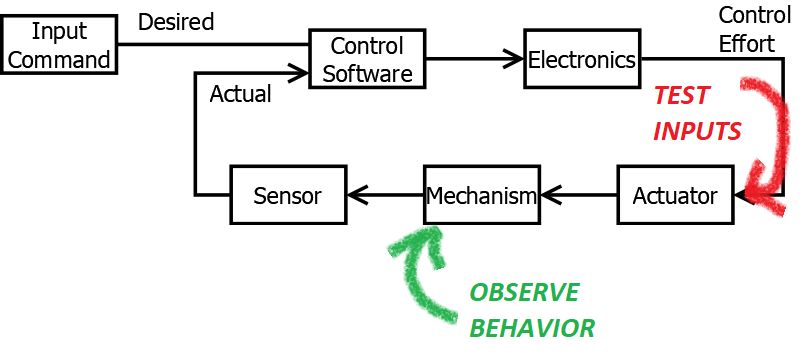
And when you jam 12 volts into this system (via ), you get motion that looks like this:
The red line shows the setpoint - the desired speed command. Our goal will be to get the shooter wheel as close to that speed as we can, as quickly as possible.
Basic Technique
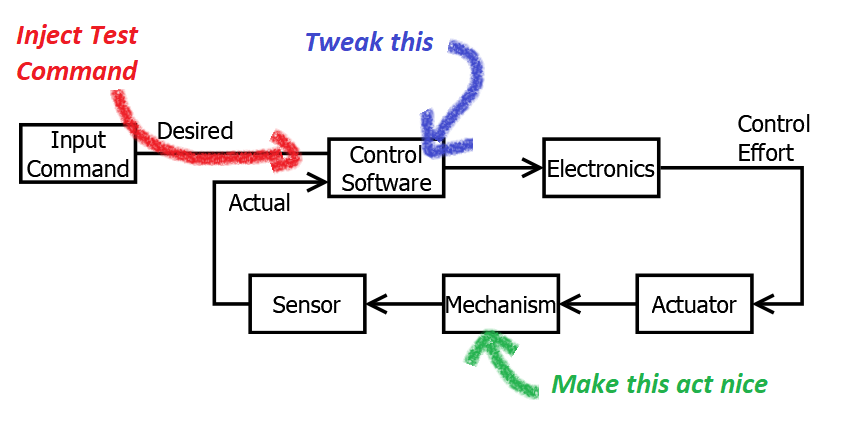
As we’ve mentioned, tuning a PID controller is the process of determining the numeric values of the proportional, integral, derivative, and feed forward gains for the controller. The exact values will be dependant on the physical system and its behavior.
The basic technique we’ll cover is effectively guess and check. There are some more algorithmic approaches, but I find its best to start with the guess-and-check method, to get the best intuitive understanding of what each gain does.
Everything we are about to describe here is a rule of thumb, not a rule. I’m sure the greybeards reading this will have lots of alternate advice, and it’s probably better than what I have to offer. But you’re here reading my blog, so I’ll tell you what I know for now :D .
For our shooter wheel, or for any velocity control, there is a prescribed order that you should generally follow: first F, then P, then D, then I. Lets walk through the process.
One quick note on technique - for all these values, start small. If the value is too low, double it. If it’s too big, cut it in half. Continue this process till you get close. At that point, you can start to fine-tune the value. But, the fastest and safest way to ge to the ideal value that I’ve found is the doubling/halving technique.
This blog post has a nifty little sidebar to help us keep track of what our system is doing as we play around with it.
Hopefully cool! This took far more CSS magic than I cared to learn. Let me know if it borks up on your computer.
Ok, now on to tuning…
F Gain
We’ll be starting with F. Choose F such that the steady state speed, with no disturbances, gets fairly close to the setpoint. Within about 10% is usually fine. For something like a shooter wheel, err on the side of “slightly too high” if possible.
Start with big adjustments:
Then do smaller tweaks when you get closer:
Or, if you get completely lost, start over:
At this point, if you were to fire up your shooter, you’ll get kinda close, but you won’t be getting there very fast. Nor will you be able to reject a constant disturbance, like changing friction or a sagging battery voltage. We need to start adding some feedback.
Hint: On this system, a good value is around 0.01
P Gain
P is next. Same thing as F - start near zero, and double the value each iteration. When P is zero, it will have no impact on behavior. When P is very very small, it has very very little impact on behavior.
Again, Start with big adjustments:
Then do smaller tweaks when you get closer:
Or, if you get completely lost, start over:
As you increase P, you should start to see your rate of approaching the setpoint get better and better. When you have a disturbance, even like a ball entering the shooter, you’ll see it bounce back pretty fast. As you start to raise P, you’ll notice a big improvement at first, as we’re actually going toward the setpoint.
You’ll be able to increase it quite a bit with much more marginal gains. Finally, at a certain point, the output starts to oscillate.
You could keep going, but eventually the output becomes very unstable.
For P, your target is to tune just barely at the point where the output starts to oscillate.
Hint: On this system, a good value is around 2.28
D gain
Then we can bring on D. D should start at about 1/100th of where you set P at. Same as before, start doubling the D gain until it takes away most of the oscillation from the P gain.
Big adjustments:
Small Tweaks:
Start Over:
Similar to P, if you make D too high, you get instability.
Hint: On this system, a good value is around 0.047
I Gain
Once you’ve got F, P, and D, it’s time to tune I. We actually don’t have any real friction modeled in this system, so we have very little steady state error to correct for. Given a response that looks like the above, I’d actually recommend skipping it.
To simulate your steady state error, you can crank up F higher than it needs to be, or zero it out. Try doing that, then using I to compensate.
To tune I, do it similarly to D. Start at 1/100th of P, and double until the steady-state error has been eliminated.
Big adjustments:
Small Tweaks:
Start Over:
Once you’re at this point - the best advice I can give - STOP. Don’t keep fiddling at random. Good enough is good enough. PID will never get quite perfect. If you are at a point that looks like this, there’s admittedly not much else you can expect.
Varying the Setpoint
Though most shooter wheels tend to be either “on” or “off”, it’s worthwhile to verify that our system can accommodate any setpoint we put into it. That is indeed the point of the controller - ensure that any incoming command is acknowledged to the best of the system’s ability.
With a properly tuned controller, you’ll see that the speed of the shooter wheel goes to the setpoint, as long as the setpoint is low enough that the wheel can physically go that fast. In our system speed above ~1.6k RPM aren’t achievable.
Next Steps - Modern Control Theory
It’s really important to mention that PID isn’t exactly… up to date. It’s been around a while. And truth be told, better stuff is out there.
And sure, math is math, so it definitely still works. But I’d be remiss if I didn’t drop some key vocab like LQR or Plant Model Inversion or (dare I even say) Machine Learning.
To tell you the truth? I don’t yet fully understand these things. I’ve had some cursory exposure to them, but I’ve not yet built a robot that required using them. Hopefully that will change soon. And when it does, I’ll write a blog post about it. Till then check out some of the presentations and code written by other teams - there are many who have gone much further. 971 Spartan Robotics stands out for me.
My advice to the beginner? Start with PID, see how far you can get. Once you’ve mastered PID, maybe try something more complex. Keep in mind the goal is functionality and learning. PID might be good enough for both. Up to you.
Conclusion
That’s all for now! Go tune your controllers!
EDIT: One additional thing - we’ve got another interactive post! Check out how to tune another common class of system found in FRC